
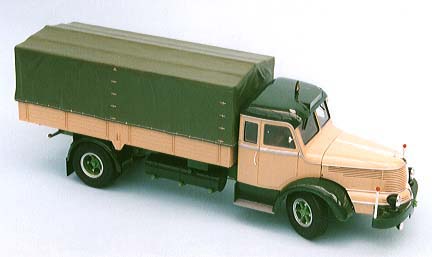
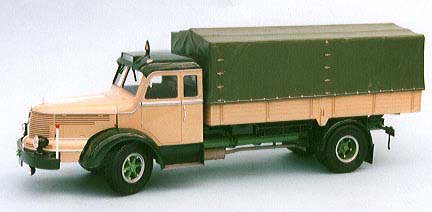
Revell
Krupp Titan
SWL80 4X2 Truck
Kit No. 07559. 1:25th scale
Since Revell announced the release of the old time series of trucks I have looked forward to each new item especially as they are from the period when I was starting my driving career, I was looking forward to some English trucks such as Bedford, Leyland Or AEC even but had to be content with German machines that were around at that time. I was not disappointed however as Revell made an excellent kit with the Bussing with plenty of detail and nicely done too as is this latest offering, looking very similar (but then most vehicles in this class looked and were built on the same lines) with the long bonnet and rounded cab don’t think this is a rerun of the Bussing kit, it is entirely new, that is to say chassis cab and engine are, but the wheels and tilt body are the same as they might well have been on the real truck.
The kit comes on 12 frames of sharply moulded parts; the body parts are in brown, the rest are in grey with the exception of the one chrome-plated frame and ofcourse the clear window frame. There is no flash and very little cleaning up of the parts to do, seven rubber tyres and a sheet of decals for two operators make up the big box full, and the instruction sheet runs to 24 pages with full colouring details
Construction notes, in general the kit goes together pretty well but one or two points may help you get a better model.
Steps 4 and 5 parts 13,44 and 45 are part of the brake linkages and I would recommend that you don’t mount these items until all the remaining linkages can be added as there is little room for error here.
Step 8 take care when adding the tank brackets (note the numbers), and make sure the tank in step 9 is made up ready so that you keep the brackets in line for mounting later after the tank is painted.
Step 12 this involves the mounting of the road springs which need careful aligning so make up the two axles first and use them to correctly align the springs before the cement sets.
Step 16 the holes in the track rod are a bit tight so I reemered them out with a round file so that the pins on parts 24/28 will rotate easily.
Step 20 assemble parts 53/54 then sand the ends level or parts 55/56 will not seat properly.
Step 22 parts 70/71 are the cab mounts and are easily misplaced so have the cab floor (part 153) to hand and ensure the pegs fit the arms before the cement sets.
Step 30 if you mount the radiator here you will have a problem later when it comes to mounting the engine in step 55 as you are told to fit it between the rad and the propshaft, an impossible task, my solution was to cut away a part of the ring surrounding the hole where the propshaft fits the clutch housing, it was quite a tussle but it worked so be warned.
Step 33 do not try to straighten out the part 202 as it bends to match the chassis rail. I broke from the plans here, I wanted my bodywork a separate colour so I only laid the runners on the chassis while adding the cross members as in step 43, carefully aligning them with the aid of the centre part of the body (part 225).
Step 57 check the alignment of the mudguard stays (parts 132/136) before the cement hardens by offering them up to the chassis.
Step 60 there is one big problem with this kit, I found it difficult to marry up the nose section part149 with the front wings, the bumper bar and the bonnet, I tried several ways to get them to line up but with not a good result so I would suggest you do not glue 149 to the bumper until all the bonnet assemblies are ready to be fitted.
Step 65 the hole for the seat mounts need enlarging to about 1.25mm for a nice fit.
Step 79 onwards is body work where you can have a choice of fits, the model looks quite good as a simple dropsider without the canopy or you can leave the canopy frames loose in the back and make a rolled up canopy using foil in with the bars, the choice is yours.Summary All in all another fine model from Revell, a good choice of subject and easy to assemble with pleasing results. Makes a fine partner for the Bussing Truck.
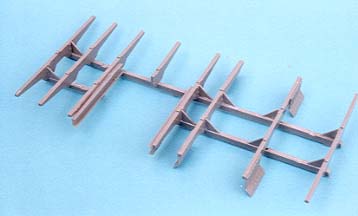
Hanomag Trailer kit No07570When I saw the towing coupling on the back of the Bussing I guessed there would be a trailer to follow pretty soon and here it is. There is nothing too exciting about trailers as they are basically a box on wheels that can be pulled by a vehicle that has power to spare, and in the fifties construction of vehicles was quite basic and so it is that the kit is true to the prototype.
Revell’s mouldings seem to go from strength to strength these days, and it shows here, all the parts are crisp and apart from the occasional mould joint line there is no cleaning up to do, the tyres are the now customary solid rubber type with lovely tread patterns and the decal sheet provides markings for three vehicles that match the Bussing and the Titan plus an un named outfit.
The basic frame construction is fairly simple but there are a couple of points to note to avoid problems.
Step 3 there are two parts 9 and they are not the same, look for the notches in the corners, these have to marry up with locations in the side frames and I would also suggest that you do not add parts 23 until step 7 when you add all the remaining frame extensions.
Step 18 make sure you trim the ends of part 47 or you will spread the bars of the “A” frame too far.
Step 19 the tabs on part 52 are the wrong way around to match the slots on the side frames so cut the larger tab to suit the slot do not turn the part 52 over or the air tank will be wrong way up.
Step 21 the hinge holes in the “A” frame drawbar are a little tight so I used a No 52 drill to enlarge them slightly.
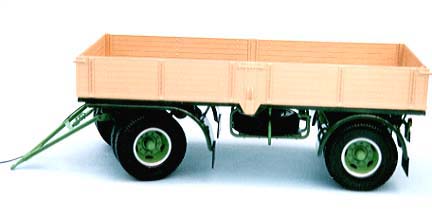
The remainder of the model is the same body work as on the truck and again you can assemble the tilt or leave it off, if you want a bit of convertability then you will find that the corner post supports (parts 302) will fit in nicely without cementing and hold the tilt frame neatly in place.
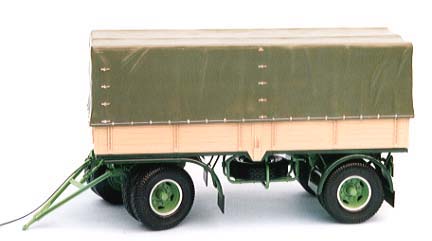
Summary It looks good behind either truck and I am sure that you will find many ways to alter the body work to suit your needs, I would have liked to see the turntable done the way Revell did the Australian road train trailers for ease of painting but that is my only quibble. There is a towing coupling on the rear of the trailer so you can build a road train if you wish, I have friends who served in Germany just after the war who tell me this was quite a normal practice out there but I have never seen it in the UK except in fair grounds.
<>
Ted TaylorJuly 2005
#Back to the Top
| Last
Page |
Airbase |
What's New |
Home |
Reviews |
Next Page |