
Italeri
Fire trucks
Pumper and escape
Kit No. 00000. 1: 24th scale
Italeri's offerings to the fire dept
Volvo Ladder Truck
Although listed as “Volvo” you will find, I believe, that other countries on the continent have different named vehicles, this really only applies to the cab. The chassis is Fiat with a Magirus air-cooled engine, in fact sprue frame ‘A’ is common to the “Fiat Cowboy” and “Magirus” kits. The bodywork and ladder are of a type which can be mounted on various chassis as required by the customer.
Construction notes
The chassis and cab are very clear and easy to assemble, the only point to watch is the rear halves of the front wings (mudguards) parts 107-112, Wait until the cab is fitted so they can be held in the correct position, at the right angle, or you could get a big gap as they have a tendency to droop. Also, make sure that the cross-member, part 181, is up the right way or the P.T.O. shaft, part 184, will be out of line. The jack mounts parts 185/6 are a sloppy fit on the chassis but I over-came this by using 30 thou. card cut into 6mm x 4mm blocks to pack out the longer arm locations.
The bodywork is simplicity in itself with no problem areas, but the turn-table will need care when cementing the rams and other moving parts if you want an operable outfit. The ladder attachment/lift, step 16 parts 2 19-235, can be made up completely before paint-ing as can the turntable base, step 17, but in this case leave part 248 off until after painting. By the way, I found part 243 fitted better behind its location bar rather than in front as indicated.
The body and equipment lockers,
parts (205/211) had the silver parts sprayed first with SnJ Spray Metal which was then masked and sprayed with Humbrol 19 Gloss Red(just a thin coat) before assembly, and the equipment locker after assembling the side pieces.
With these fire trucks I found it best, in most cases, to build as much as possible before spraying so you can eliminate any joins but stop before it’s too difficult to spray any inner surfaces, use your own judgement according to your skills. I personally find it a lot easier to spray ltaleri cabs before assembly, as areas are smaller with no overspray problems and the assembly follows natural join lines making it easy to cement together without damaging the paint.
The most attractive part of this kit is the extendable ladder, it is so finely moulded that it will demand careful attention when constructing. The first job is to remove, with a square file, the ejector pin marks on the inner sides of the handrails where the next section will slide along, this will give a lovely smooth action when all are together. Careful delicate cementing with a gentle glue like Slater’s Mek-Pak will be beneficial to such finely detailed parts and when the main parts are cemented, just try the section together once to see all is well, and leave aside to harden for 24 hours. Note that parts 287/288 (pulleys) are handed, so take care when cementing to frames.
An excellent kit which I first thought was expensive, but when you open the box and see the contents you will probably agree that you get your money’s worth.
The Opel Blitz Truck has now been released with a tanker body and associated pump gear, plus a hose reel and triple extension wooden ladder. The vehicle is used basically to put out fires rather than as a means of escape, and these operated around Germany during the last war with good effect. I felt that this latest version looked much better than the original kit Italeri Opel Classic Fire Pumper
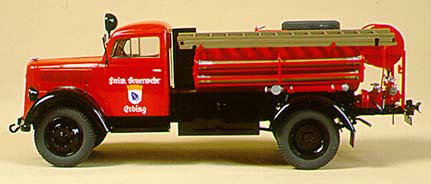
Construction notes
I found that when assembled the steer-ing wheels would not turn to the right properly, and the easiest way to cure the problem was to make a new drop arm, part A45, to the same pattern but 2-3mm longer. The drag link is the real problem but it’s harder to make.
Beware of parts 91 and 92 the mudguard stays, as you can easily get them mixed up. The pair that has large location lugs is for the rear fittings while the narrower set are for the front where they fit the chassis.
Assemble the cab after painting but take a little extra care as the locations are quite fine and you can easily get a distorted shape.
The water tank needs just a little cleaning up along the join and I found the end plates need a little help with filler, but I used PVA glue which finds its own level and works quite well.
The instructions give plenty of colour information and you should be able to make the model look quite impressive. I sprayed the red parts with Humbrol Gloss 19, but the black wings I hand-painted using Gloss2l. Careful painting of the pump and outlets will pay divi-dends.
Another adaptation from an Italeri kit, as was the real “truck”. Using their basic jeep kit, Italeri have added an angle iron framework to carry a ladder and some short sections of suction hoses. A water tank is mounted where the back seat used to be and on this has been mounted a hose reel to deal with fires. A pair of extinguishers are mounted on the back and a pump with delivery outlets is mounted on the front where the winch used to be. Add to all this some tools, lights and a beacon and there you have it. Italeri— FireJeep
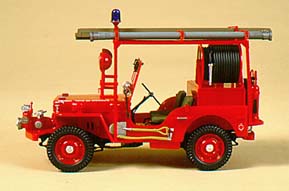
Construction notes
When mounting the engine in the chassis you will find that the part numbers for the drive shafts are wrongly listed. Part 37 fits at the front and part 38 at the rear. Also in step 9, parts 112-113 are in the wrong position; part 112 should be on the right-hand side. Other than these two minor problems the kit is quite straight-forward. I built up the bodywork as in step 5 before spraying with Gloss Red 19 with most other major assemblies such as framework, water tank and hose reel being done the same; the bonnet, grille and front bumper were sprayed before mounting in the appropriate positions. Decals are given for four outfits but the principality of Monaco has the most to put on. Quite a good little model, a bit unusual but nice nonetheless.


#Back to the Top
| Last
Page |
Airbase |
What's New |
Home |
Reviews |
Next Page |