Tamiya
F-4J Phantom II
Navy fighter
Kit No. 0000. 1:32nd scale
Tamiya
F-4J Phantom II
Navy fighter
Kit No. 0000. 1:32nd scale
It's a big one from Tamiya not without it's faults though, Very expensive in the Uk,
As expected Tamiya have reissued their Phantom kit as a US. Navy F-4J and quite good it looks too, what's new? For a start you get two new frames H and J" appropriately, H giving you all the Navy cockpit instruments and consoles including the backseater's side wall and new wheels then J gives you all the external bits peculiar to the rust pickers" oops! Sorry Navy, such as slotted tails, straight pylons, refuelling probe and new fin cap they haven't forgotten the bumps on the wing over the bungees at the top of the undercarriage legs. Navy aircraft always seem to look bright with the grey over white scheme and during their life time some have carried some very fancy markings some might say garish even,
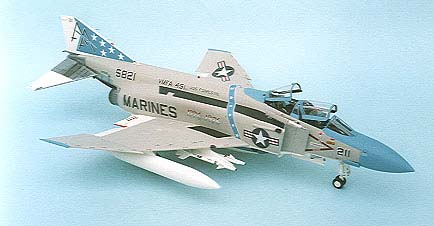
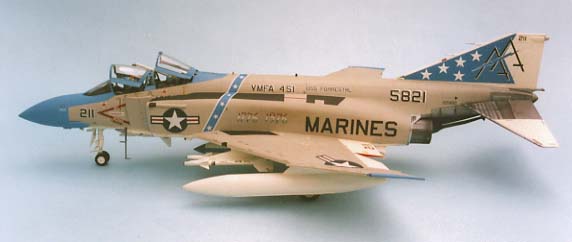
Tamiya have reflected this in the decals provided, one is Randy Cunningham's aircraft from VF-96 Fighting Falcons, the second is from VF-151 Vigilantes with black and yellow striped tailfin and the third is a real eye catcher from VMFA-451 Warlords, a marines squadron, with large areas of light blue with stars dotted around specially painted up for the bicentennial celebrations in 1976. All these marking come on two very large decal sheets
The kit, once again I was impressed with the one piece fuselage moulding but this time I took the trouble to sand off all the raised plates and rivets this took a little time as it must be done with care so as not to damage surrounding areas, then with a fine "P" cutter I rescribed the panel lines as needed but do please note not all the edges of the plates are panel lines, check your drawings! It may be my imagination but this kit seemed to go together a lot easier than the original I think some of the locations are more positive but there are still one or two sloppy fits such as the refuelling probe box (part J25) you may want to add a little packing from behind and the spine panel (part J14) is a loose fit, I packed two edges out with 10 thou plasticard and sanded smooth when hard.
In general the construction is easy and straight forward but a few points are worth noting, parts B28/29 are the rubbing plates on the stabilators, once you have cemented them in place slip the whole section into the fuselage to make certain they set at the right angle or you could have a problem when you come to fit them after painting. I found it a lot better to build up the main wing section, tops and bottom before adding to the fuselage this precludes the use of two screws but with a little care you can get a good cement joint to the fuselage and it was at this stage I added the intakes and ramps rather than earlier as instructed, the outer wing panels were added when all the joints were cleaned up. If you intend to put the crew aboard leave their left arms off until they are in position or you won't get 'em in and remember to use the corrected decal for the rear instrument panel in step 22. The canopy locks (parts C15) are painted black but the canopy jettison handles (parts C14) are yellow with black stripes quite important from a pilots point of view. I have lowered my canopies, to avoid breakage’s, by shortening the rams (parts F2/3) and part J47 is not required on the plane I chose to do but check your choice won't you.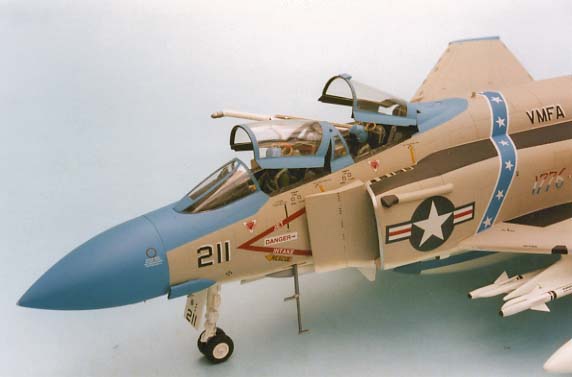
Painting and decalling, the instructions have a couple of mistakes on the colour plan, although basically a grey over white scheme for all three choices, the rear end of the fuselage below the rudder should be bare metal not grey as shown and in the case of VMFA-451 warlords" the fin should be white not grey (there is a good colour photo in kokufan FAOW. No 114.) also note on page 18 of the plans in the top view that the blue around the canopies area does not extend through the band of stars on decal No 91 it finishes around the canopy fairing bulge, finding a blue to match the decals was tricky but Revell No 50 or Humbrol No 48 Mediterranean blue is a pretty good match the latter being slightly closer when matt varnish is finally added after decalling. The order of painting I used was as follows, canopies were masked up and the blue sprayed freehand where needed on the nose and wing tips next day the blue was masked with Tamiya tape and the white sprayed again freehand, I left the fin and stabilators separate until the decals were in place, next day the white top surfaces of the flaps were masked along with the rear end of the fuselage which was already Rub n' buffed, then the grey, I used Humbrol No40, was sprayed freehand along the fuselage sides and if you spray the wing edges held at 90 degrees you will get that nice feathered edge you want. All the masking except the canopies was removed as soon as possible and any paint edges rubbed down with a well worn bit of 1200 wet or dry paper when all had hardened off a couple of coats of Klear were sprayed on ready for decalling this was not absolutely needed as I had used gloss paint but I do like to encase the decals and protect the paint, it helps if you want to do some weathering later.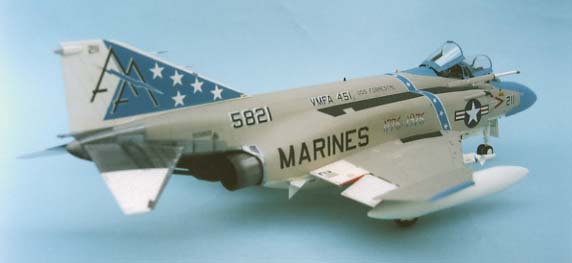
The decals are very thin and in good register, the carrier film completely disappears on a gloss finish but if you do get a problem with silvering a good tip is to dry the decal off then use a brush to slide a tiny drop of Klear ( Future) under it now roll a finger over it to remove any excess and brush a little drop over the design all should now be well. After my decals were all in place a good coat of Klear was brushed all over and a few minutes later a light coat of Revell No2 flat varnish was dusted over to give a nice sheen and even finish. Now the canopies are unmasked and any bright spots such as navigation lights or pitot tubes etc. are painted. Finally the tail sections were added and any other weapons etc were mounted on the various pylons, the tyres were popped onto the wheels and there stood a very presentable model.
I still think it is a shame about the plates on the surfaces but you can get over these what you can't get over is the terrible view down the intakes showing the trunking but other than that it is a very good model that will always catch the eye a bit expensive compared with the Revell kit but it is the only game in town after all.
Back to the topTed Taylor 1998