
Tamiya
F-4C Phantom II
Michigan ANG
Kit No. 0000. 1:32nd scale
When rumours started circulating about a large phantom from the Tamiya stable I started to rub my hands together thinking here will surely be the best yet “ and It must be an F-4E as this is the type used by the Japanese, I later learned that it was to be the earlier C/D" even better I thought as we already had the Revell kit of the E" available. After a long wait it finally arrived and I eventually got busy.
On opening any kit box I normally dive straight for the frame with the cockpit parts on it as it is generally a good guide to the rest of the kit but in this case what caught my eye was a massive one piece moulding of the fuselage quite incredible, this I felt had it's advantages but it has it's drawbacks also. As one has come to expect with Tamiya the frames are beautifully moulded and surface details are superb, the cockpit detail is nicely done with raised details on the side consoles and separate throttles and Wizzo's radar control hand grip, you get a choice of two front instrument panels (both pretty accurate) with some clear plastic bezels backed up by decals making them quite effective, the internal structure of the cockpit walls is depicted on the interior of the fuselage and behind a panel for the navy refueling probe (watch out for it) is the large circuit breaker panel which is missed in so many F-4 models, the seating arrangements are pretty basic with no straps etc. but you get two nice pilots to sit on them if you wish, all in all an excellent part of the model. What else do you get? Well the undercarriage legs are metal, you need this to take the weight of such a big model, these are augmented with plastic parts, the rubber tyres fit around well detailed wheels with separate brake areas, the wheel bays have detailed walls to fit between the two wing halves the outer flaps can be drooped and the outer wing panels are separate with detailed hinges possibly for a navy plane? One big problem with phantom models is getting the tail planes at the correct anhedral, Tamiya have overcome this with a one piece moulding that allows you to move the whole unit to whatever attitude you want even the rubbing plates move, the fin is another individual unit and lends itself to the cutting and repositioning of the rudder.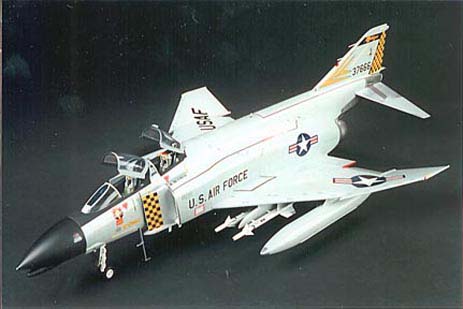
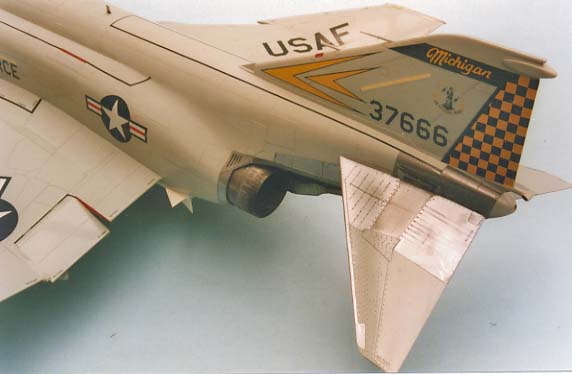
An unusual approach was made to the titanium rear underside where the jet efflux emerges, the whole bare metal area is moulded as one item so it can be sprayed with your favorite metallic finish and no masking is needed but you must take care to make the final assembly to the fuselage flawless. The canopies are crystal clear and their frames are separate but you need to take extra care when cementing the bits together, I have used Slaters Mek-Pak, which is a very mild cement and should not damage the clear parts if applied with care. A nice attempt has been made at the afterburners and exhausts with fine detail on the inside and out, this assembly along with the intake trunking are screwed into position and don't need cement but I prefer (where ever possible) to cement other joints and leave them to harden before adding screws as they sometimes distort the assembly. The three sets of markings on the decal sheet are all for the Vietnam era and depict a couple of MIG killers so in keeping with that period there is a large selection of stores with sparrows sidewinders and bombs which can be transported on T.E.Rs or M.E.Rs, an ALQ-87 ECM pod and it's sparrow recess pylon is also included.
Does all this sound too good to be true? Well there is a down side to all this I am afraid it seems that Tamiya's researchers looked at an aircraft that had previously been used at a battle damage repair unit where trainees are taught to put patches over damaged areas to “get them flying again" and this kit reflects that as the fuselage is covered with raised riveted panels none of which would be on service machines this really does spoil the overall effect of the model and I would advise that you remove these so that you have a smooth surface and then rescribe the correct panel lines, beware though they aren't exactly where the patches are. The other bad point is in the intakes, you can see the front edges of the trunking and I could not see a way around this problem except placing intake FOD guards in position.
Construction notes
Step1 I have painted the intake trunking white not grey and I used various silvers on parts C 18/19 to give some contrasts.
Step3 the intakes parts A1/2 will need some filler as the fit is none too good.
Step6 remove the small excess tab from the tailplanes with a sanding block not a knife as you can easily cut through the part itself.
Step7 I departed from the plan here, I left the under tail section and stabilizer off for ease of painting I also discovered that the base of the fin / fuselage join needed some filler so this was done before painting of course which in turn meant that the screw to secure the tail section could not be used so it had to be carefully cemented as one of the last jobs.
Step9 the upper wing halves have no locations on the fuselage side and are quite flexible so I decided to pack out the space between with scraps of thick plasticard to keep the wing solid then ensure you make a good strong cement join here, check also that the outer ends are flush.
Step13 parts C20 need to be tight to the under carriage leg, before using the screw remove any paint that might stop it going right home.
Step16 you need to open the holes in the pylons for the chaff dispensers parts G32 / 33 but there are more than two so make sure you use the ones with the tiny arrow heads and remember that sway braces parts G5 / 6 and G7 / 8 are handed, the slant should follow the wing leading edge, offer the pylons up to the wing before the cement hardens to make certain that they hang vertical and the braces touch the wings at each end, the same applies in step 19.
Step23 I refined the edges of the intake at the base of the fin for appearances sake also note that there is a different splitter plate here on the C" so don't go altering it up to E" standard.
Step25 the seats are without straps useful if you want to add you own but I chose to add the new resin seats from True Details which are made for this kit specifically and are beautifully done
Step27 looks a little confusing but with care you can sort out the parts you need for your version. paint parts C15 canopy locks black but parts C14 are the canopy jettison handles and are black and yellow striped it's important to the pilots.
Step28 the central recess in part F27 is just that so do not paint it to represent a mirror I have seen mirrors mounted there so you can fit one if you wish, I found rams parts F2 / 3 held the canopies a bit high so I reduced their length by about 2mm.
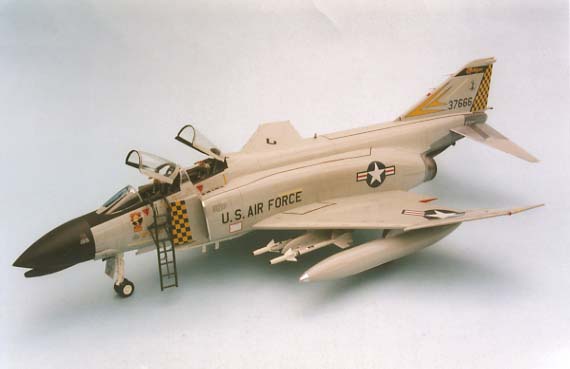
Full painting diagrams are shown but I have grown tired of S.E.Asia colours for a while and the new decal sheet from Cutting Edge decals arrived with markings for the Michigan A.N.G. painted in ADC grey so I plumped for that scheme using Humbrol No 146 light grey this is a perfect match and dries very quickly but you do need to spray the paint to get the gloss finish in this scale. Some basics were required from the kit decal sheet and when I placed these in water the decals broke into tiny fragments, Messers RIKO came to the rescue with a replacement sheet but do try yours out with some spare items if there is a problem you can coat the sheet with a new product from Microscale called liquid decal film this really works well and is available from Hannants of Lowestoft. My walkway outlines were made up from Xtradecal fine black lines and the areas inside were coated over the main colour with Revell No.2 flat varnish. With the scheme that I used I had to add the light strips to the fuselage and fin, these I cut from 5thou plasticard before painting.
Summary, it's certainly a good kit, very impressive when finished and really captures the shape of the short nosed brute, it is such a pity about the effort you need to put in to remove the extra plating. Value for money? It is expensive but the built in quality ensures a good result and remember it is the only kit available of this version at this scale.
TED TAYLOR
Jan 1997