 <>
<>Academy
F-111E Ardvark
converted to F-111F
Kit No. 1689. 1/48th scale
CHANGING GUARD AT LAKENHEATH,
from Vark to Eagle
Extra! Extra! Giving a lift to two good
kits
with Paragon parts and Xtra-decals.

Whilst I like to
make models of all kinds
of subjects I think aeroplanes are probably my favourite, especially if
I can run short themes to give a little flow to a display of models
i.e.
different marques of one aircraft, a number of colour schemes on one
type,
a selection of types in one service such as the navy etc. etc. Recently
an
opportunity arose to do a short theme which also provided a chance to
do
some super detailing and some converting to enhance two quite good kits
making
one more accurate and one quite stunning to see
It all started with Xtradecal’s sheet No X015-48 covering three aircraft from the 48th TFW based at the "Heath" who were just trading in their F-111Fs for the F-15E Strike Eagles. I must warn you here that sheets like these could cost you money and could possibly cause a serious improvement in your modelling skills. I just could not resist the chance to make both these aircraft using the Paragon’s sets specially designed for the Academy F-111E (which has the large intakes) and the Hasegawa F-15E kits respectively.
48012 F-111flaps and slats set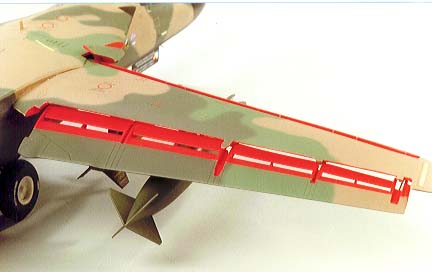
This set also includes the "interiors" as well as the wing gloves that are so prominent when the slats are out, full instructions are provided on an A4 sheet of where to cut your kit parts and how the new parts fit in afterwards. (note that this set can be used for all but the FB-111s). The resin parts in my set had a slight warpage on the longer parts so each in turn was cut off it's plinth and numbered with a felt tip pen then each was immersed in a bowl of boiling water, using tweezers, for a few seconds. When pliable each was held against a straight block of wood and plunged under a cold tap until firm again.
 Before cutting any plastic away from
the kit
parts check that the resin parts match the panel lines, if not, adjust
one
or the other with a file, I accidentally cut too much away in one place
but
I filled the gap with 15thou card and just smoothed the edges over.
Take
care gluing parts 3 and 4, ensure the wings are dead straight and keep
the
taper constant, parts 5 and 6 are just as important but you may need to
adjust
the ends a little
Before cutting any plastic away from
the kit
parts check that the resin parts match the panel lines, if not, adjust
one
or the other with a file, I accidentally cut too much away in one place
but
I filled the gap with 15thou card and just smoothed the edges over.
Take
care gluing parts 3 and 4, ensure the wings are dead straight and keep
the
taper constant, parts 5 and 6 are just as important but you may need to
adjust
the ends a little
The runners on my slats did not quite mate with the slots in parts 3 and 4 so the slots were filed slightly until all was well. The mini flaps parts 9--16 were glued into each main flap then a small hole was drilled into the front face of the centre and outer runners with matching holes made in parts 5 and 6, these are to take florists wire "screw jacks" which can be superglued into the flaps and just slipped into the wing, making the flaps adjustable to any angle. (see ref photos in D&S book). If you wish to detail the basic kit then S.M.I. Nov. '89 issue carried a superdetailing article which could be useful,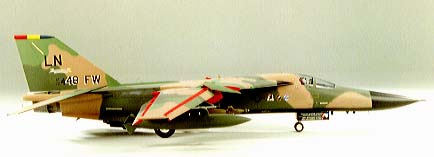
Painting and decaling is fairly straightforward but do remember to match each extended part to the camouflage on the wings, I masked the "internal" areas off using Tamiya's masking tape which never seems to pull the paint off, spray a base coat of Humbrol 130 satin white and finish off with Hu 60 matt red, if that's too much for you, hand paint these areas and it should be acceptable.
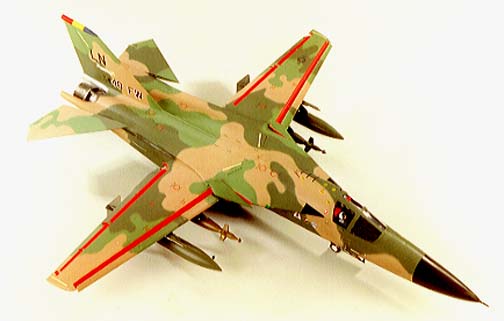
Once you have your favourite finish all over the flaps can be pushed into position and the remaining bits and pieces can be secured with a dab of superglue. As my decals were for the 48th TFW at Lakenheath who operate the F-111F with those big engines, I acquired a set of Paragon 4806 resin afterburners which when assembled fit straight into the rear fuselage without further modification. I think you will agree that the model is really impressive made up like this in its final livery before it departed for the USA
It all started with Xtradecal’s sheet No X015-48 covering three aircraft from the 48th TFW based at the "Heath" who were just trading in their F-111Fs for the F-15E Strike Eagles. I must warn you here that sheets like these could cost you money and could possibly cause a serious improvement in your modelling skills. I just could not resist the chance to make both these aircraft using the Paragon’s sets specially designed for the Academy F-111E (which has the large intakes) and the Hasegawa F-15E kits respectively.
48012 F-111flaps and slats set
This set also includes the "interiors" as well as the wing gloves that are so prominent when the slats are out, full instructions are provided on an A4 sheet of where to cut your kit parts and how the new parts fit in afterwards. (note that this set can be used for all but the FB-111s). The resin parts in my set had a slight warpage on the longer parts so each in turn was cut off it's plinth and numbered with a felt tip pen then each was immersed in a bowl of boiling water, using tweezers, for a few seconds. When pliable each was held against a straight block of wood and plunged under a cold tap until firm again.
Before cutting any plastic away from
the kit
parts check that the resin parts match the panel lines, if not, adjust
one
or the other with a file, I accidentally cut too much away in one place
but
I filled the gap with 15thou card and just smoothed the edges over.
Take
care gluing parts 3 and 4, ensure the wings are dead straight and keep
the
taper constant, parts 5 and 6 are just as important but you may need to
adjust
the ends a little The runners on my slats did not quite mate with the slots in parts 3 and 4 so the slots were filed slightly until all was well. The mini flaps parts 9--16 were glued into each main flap then a small hole was drilled into the front face of the centre and outer runners with matching holes made in parts 5 and 6, these are to take florists wire "screw jacks" which can be superglued into the flaps and just slipped into the wing, making the flaps adjustable to any angle. (see ref photos in D&S book). If you wish to detail the basic kit then S.M.I. Nov. '89 issue carried a superdetailing article which could be useful,
Painting and decaling is fairly straightforward but do remember to match each extended part to the camouflage on the wings, I masked the "internal" areas off using Tamiya's masking tape which never seems to pull the paint off, spray a base coat of Humbrol 130 satin white and finish off with Hu 60 matt red, if that's too much for you, hand paint these areas and it should be acceptable.
Once you have your favourite finish all over the flaps can be pushed into position and the remaining bits and pieces can be secured with a dab of superglue. As my decals were for the 48th TFW at Lakenheath who operate the F-111F with those big engines, I acquired a set of Paragon 4806 resin afterburners which when assembled fit straight into the rear fuselage without further modification. I think you will agree that the model is really impressive made up like this in its final livery before it departed for the USA
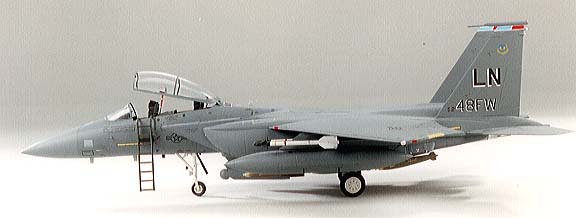
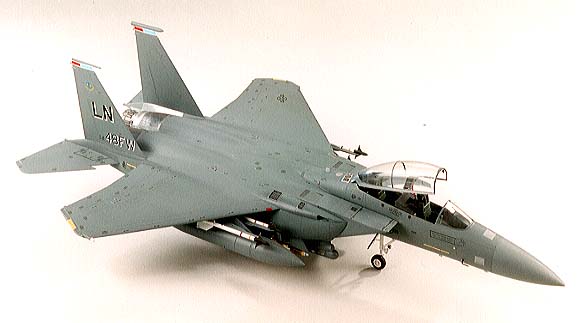
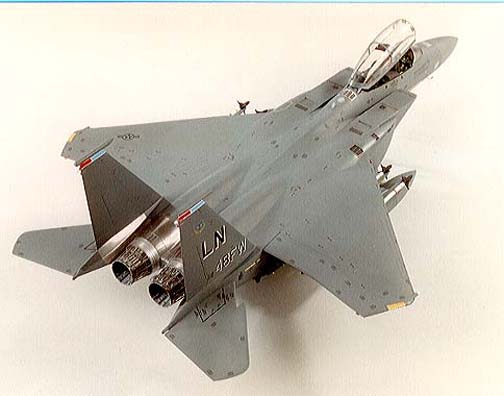
Hasegawa
F-15E Strike Eagle
Kit No.P21 . 1/48th scale
CHANGING GUARD AT LAKENHEATH, (part 2)
When Hasegawa issued their
F-15E dual role fighter kit No P21, they
updated it by adding the larger wheels and the "LANTIRN" pods together
with new rear end ECM pods and a sheet of etched metal parts for the
engine exhausts which is fine but only goes halfway to making a true
strike eagle, Paragon’s set makes up the difference supplying the parts
to make up a 48th TFW bird out of Lakenheath
The kit itself needs some modifications, which are noted on the A4 sized instructions but others are also needed if you want to go the whole hog. Starting in the cockpit, a new wizzo's instrument panel is provided but his two hand controllers are not nor are the new style H.U.D. not too difficult to overcome.
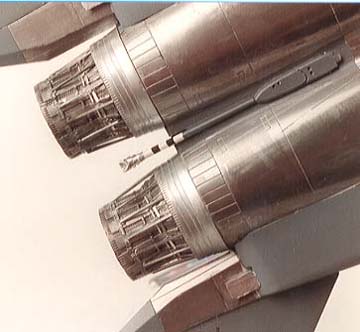 One area
where I departed from kit was the metal parts for the exhausts
while the actuators parts MA1 are fine but the bars MA2 are not really
flat
slivers of metal so I replaced these with 20 thou square plastic strip
and
they look much better especially when added to the new resin jet pipes
with
their delicate interior ribbing, quite like the real thing, remember
when
you paint though the interiors are mostly white ceramics and not sooty
as
one would expect (see your ref photos). The fairing between the jet
pipes
has to be removed and the resulting hole will need covering with 20thou
plasticard,
new resin parts are provided for the tail hook but you have to supply
the
plastic rod, when painting, the central area around it is dark grey
with
only the rear half of the rod painted with black and white bands.
One area
where I departed from kit was the metal parts for the exhausts
while the actuators parts MA1 are fine but the bars MA2 are not really
flat
slivers of metal so I replaced these with 20 thou square plastic strip
and
they look much better especially when added to the new resin jet pipes
with
their delicate interior ribbing, quite like the real thing, remember
when
you paint though the interiors are mostly white ceramics and not sooty
as
one would expect (see your ref photos). The fairing between the jet
pipes
has to be removed and the resulting hole will need covering with 20thou
plasticard,
new resin parts are provided for the tail hook but you have to supply
the
plastic rod, when painting, the central area around it is dark grey
with
only the rear half of the rod painted with black and white bands.
The tail fins need some detailing, and although a sketch is drawn out for this work it would have been nice to have it the size of the actual part so you could just trace it off. Because of the beefed up wheels and tyres the main gear doors are now slightly bulged to accommodate them, new resin doors are provided but mine were not a perfect fit so I filled the gap with a drop of PVA glue.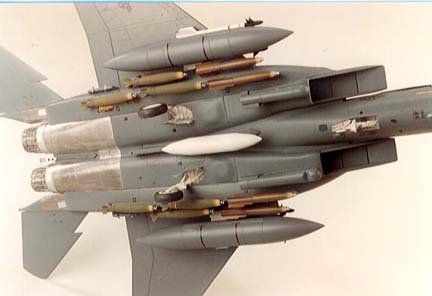
A new nosewheel fork is supplied, I would suggest you drill a tiny hole and insert into the leg with a wire pin to give a secure fixing point you will also need a small plastic "mushroom" to represent the nut that holds the wheel on.
The pylons all fit nicely but do take care locating the small ones, I just hope I got all mine straight and level, before you mount them file slots in the lower edges to take the sway braces, there are plenty in the kit and all the locations for them are moulded in. The eagles based at the 'Heath have a large air intake on the sides of the CFTs, these are supplied as resin parts but only to be used in conjunction the Xtradecal’s markings for the Suffolk base. I thought the kits LANTIRN pods a bit crude so it might be worth investing in Verlinden’s set, which contains a set for the F-16 as well.
Painting and finishing apart from the bare metal areas this aeroplane is finished in F.S.36118 gunship grey overall, I have used Rub 'n Buff silver leaf for the metal areas darkened slightly with Zebo grate polish, this was then coated with Johnsons KLEAR before masking off with Tamiya tape. The grey used was Xtracolor X130 but Humbrol No 125 is the same colour, I have noticed lately that nose cones are appearing in a slightly lighter shade so I added a couple of drips of white to the remaining paint in the jar to create a little difference at the front end.
All the ECM bumps and large blade aerials are painted very light grey, almost white, while the anticollision beacon and navigation lights were painted Hu No 11 silver fox before adding a coat Tamiya clear red or green in the appropriate positions, don't forget the tail lights on the rear of each fin, the starboard (right) one is red the other is clear. The F-15E can carry a vast array of weapons so assemble the payload of your choice, refer to the “Gulf air war debrief” for typical loads. I have used some Mk82 500lb GP bombs with PP Aeroparts BSU-49 ballute tails. The wing pylons carry sidewinders for defence and of course the kit fuel tanks. Also from the Tim Perry stable I have added three mirrors to the canopy frame which I thought set it all off. Now you have a good representation of "strike Eagle".
The kit itself needs some modifications, which are noted on the A4 sized instructions but others are also needed if you want to go the whole hog. Starting in the cockpit, a new wizzo's instrument panel is provided but his two hand controllers are not nor are the new style H.U.D. not too difficult to overcome.
One area
where I departed from kit was the metal parts for the exhausts
while the actuators parts MA1 are fine but the bars MA2 are not really
flat
slivers of metal so I replaced these with 20 thou square plastic strip
and
they look much better especially when added to the new resin jet pipes
with
their delicate interior ribbing, quite like the real thing, remember
when
you paint though the interiors are mostly white ceramics and not sooty
as
one would expect (see your ref photos). The fairing between the jet
pipes
has to be removed and the resulting hole will need covering with 20thou
plasticard,
new resin parts are provided for the tail hook but you have to supply
the
plastic rod, when painting, the central area around it is dark grey
with
only the rear half of the rod painted with black and white bands.
The tail fins need some detailing, and although a sketch is drawn out for this work it would have been nice to have it the size of the actual part so you could just trace it off. Because of the beefed up wheels and tyres the main gear doors are now slightly bulged to accommodate them, new resin doors are provided but mine were not a perfect fit so I filled the gap with a drop of PVA glue.
A new nosewheel fork is supplied, I would suggest you drill a tiny hole and insert into the leg with a wire pin to give a secure fixing point you will also need a small plastic "mushroom" to represent the nut that holds the wheel on.
The pylons all fit nicely but do take care locating the small ones, I just hope I got all mine straight and level, before you mount them file slots in the lower edges to take the sway braces, there are plenty in the kit and all the locations for them are moulded in. The eagles based at the 'Heath have a large air intake on the sides of the CFTs, these are supplied as resin parts but only to be used in conjunction the Xtradecal’s markings for the Suffolk base. I thought the kits LANTIRN pods a bit crude so it might be worth investing in Verlinden’s set, which contains a set for the F-16 as well.
Painting and finishing apart from the bare metal areas this aeroplane is finished in F.S.36118 gunship grey overall, I have used Rub 'n Buff silver leaf for the metal areas darkened slightly with Zebo grate polish, this was then coated with Johnsons KLEAR before masking off with Tamiya tape. The grey used was Xtracolor X130 but Humbrol No 125 is the same colour, I have noticed lately that nose cones are appearing in a slightly lighter shade so I added a couple of drips of white to the remaining paint in the jar to create a little difference at the front end.
All the ECM bumps and large blade aerials are painted very light grey, almost white, while the anticollision beacon and navigation lights were painted Hu No 11 silver fox before adding a coat Tamiya clear red or green in the appropriate positions, don't forget the tail lights on the rear of each fin, the starboard (right) one is red the other is clear. The F-15E can carry a vast array of weapons so assemble the payload of your choice, refer to the “Gulf air war debrief” for typical loads. I have used some Mk82 500lb GP bombs with PP Aeroparts BSU-49 ballute tails. The wing pylons carry sidewinders for defence and of course the kit fuel tanks. Also from the Tim Perry stable I have added three mirrors to the canopy frame which I thought set it all off. Now you have a good representation of "strike Eagle".
There are
still markings left for an F-4D on
the
sheet if you want to go on further but a "changing of the guard" was
enough
for me.
Reference material, a list of books comes with the sets but I would also recommend "Lock on No22 from Verlinden for anyone working on the Eagle and Aeroguide No22 from Linewrights for use with the F-111E/F.
Reference material, a list of books comes with the sets but I would also recommend "Lock on No22 from Verlinden for anyone working on the Eagle and Aeroguide No22 from Linewrights for use with the F-111E/F.
| Last
Page |
Airbase |
What's New |
Home |
Reviews |
Next Page |