
Airfix
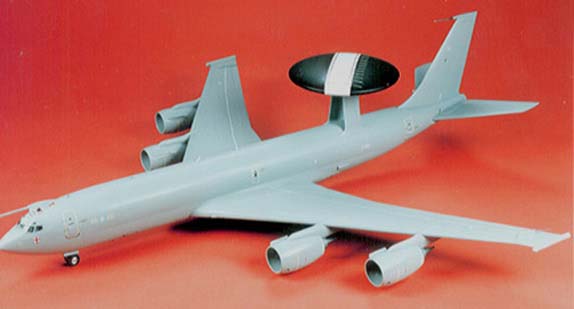
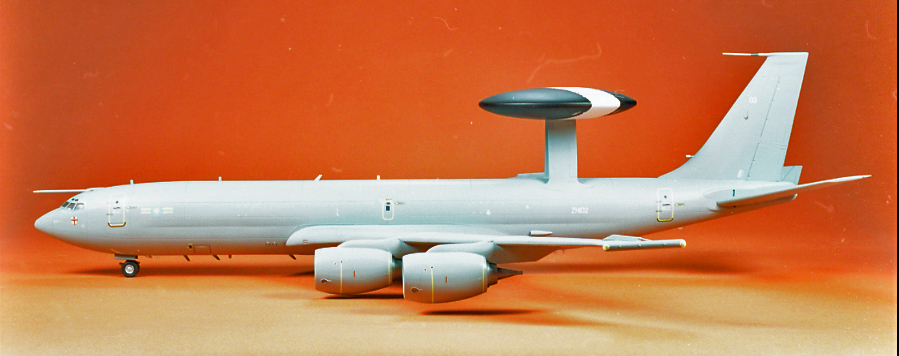
Boeing E-3D Sentry AEW-1
RAF. AWACS
Kit No. 00000. 1:72nd scale
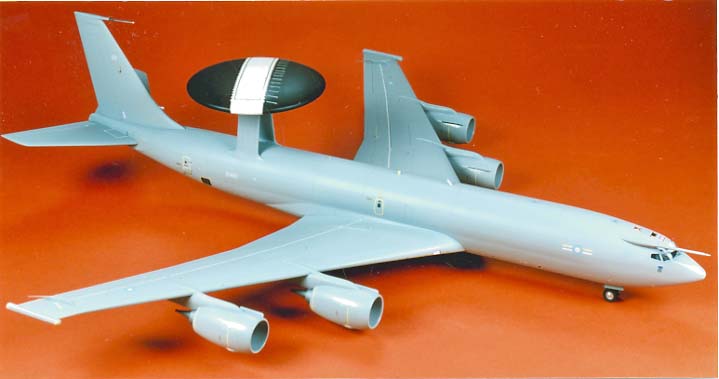
Heller’s 1:72 scale Boeing 707 kit was reissued some time ago as the NATO! OTAN AWACS featuring that great revolving radar perched atop. How-ever, it still retained the original small diameter 707 engines. When the British and French governments ordered the aircraft, they specified the new turbo fan engines, recognisable by their large diameter. These provide 22,000lbs static thrust each and can keep the aircraft airborne for 10 hours unrefuelled. The RAF also have the large ESM (Electronic Surveillance Measures), pods mounted on the wing tips which distinguishes their aircraft from the French.
The Airfix Boeing AWACS E-3D Sentry kit is moulded in a soft grey plastic which is easy to work and the parts all fit together quite well. Details, such as panel lines, are engraved, but a number of fairings and vortex generators are nicely raised. All the original airliner windows have been filled in so this removes an otherwise tedious task. The myriad of tiny aerials are all separate pieces, so you are able to clean up the fuselage join without damaging them, but do remember to open up all the location holes for them before closing up the two halves.
The flight deck is fairly basic with four seats, control columns and instrument panel, but in this scale it is adequate. The new engines are provided, and nice representations they are too I might add, as are the alternative wing tip pods. However, the original engines are still included so you have some items for the spares box.
The model is uncomplicated and the three-page instruction sheet is quite enough to get you through the construction sequences, but note that part numbers are in circles while the other numbers represent the Humbrol paints to be used. One final sheet covers a very comprehensive decal plan for both versions. The decal sheet is almost as big as the box itself, half of which is used for one version. So detailed is this sheet it took me a whole day to put them all on!Construction notes
All the larger parts are held onto the runners with fairly wide ‘gates’, so take care when removing them. I would suggest that you run a sharp knife along both sides of the plastic before actually cutting through.
Weight is required in the nose, some 85gms, which is a lot! After fitting the cabin and wheel bay in one half, pour in some shotgun pellets mixed with Humbrol Superfastepoxy glue as near the front as possible. If you have trouble getting it all in now, wait until the fuselage halves are joined and put, or pour, the remainder in through the wing location hole and shake down to the front end.
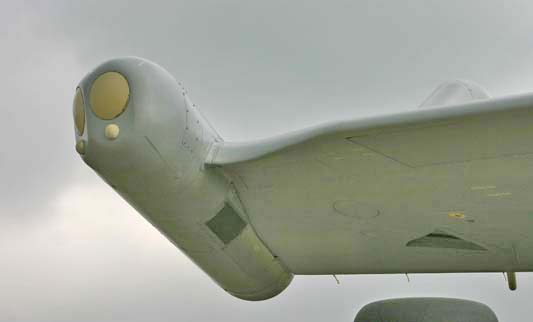
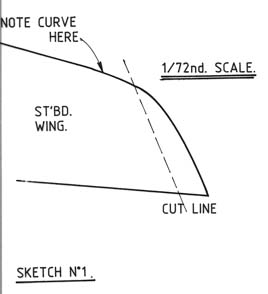
Before you join up the wing sections, scribe the cut line on the out-side of the tips (for RAF version only) but do not remove them until you have all the wing assembled and hardened. This helps with alignment, which obviously needs a little extra care to get a good straight wing.
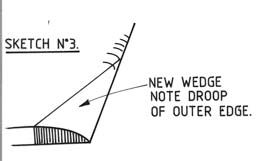
If you are building the French version, then the wing tips are correct as they are, but for the British version, Airfix have provided new wing tips and pods, plus UHF aerials to mount on these. Unfortunately, these are not quite correct, but Airfix are aware of this. The problem is that the “cut line” is out past the spot where the wing starts to curve back to the original shape, so the new tips and pods have to follow this line also, or look odd. In actual fact, the real wing carries on in a straight line right out to the pod. It is pretty obvious that Airfix are unable to alter the original mould due to excessive costs and later usage, so they have made a very reasonable compromise to get over the problem.
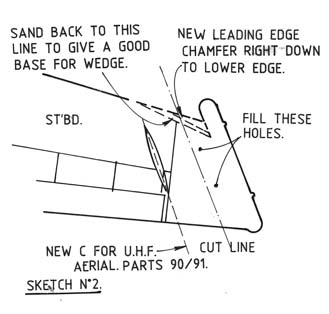
However, the error can be rectified quite easily for those purists out there with a small wedge of 60 thou plastic card (see sketches). Once the wing tip joint is hard, sand the curve back to a straight edge, wide enough to accept and anchor the wedge. Sand the leading edge to the correct line, then sand the aerofoil section with the outer edge drooping right to its lower edge.
Another modification which you can make, is around the landing lights. The RAF have one large lamp on the star-board side with two on the port side. Unfortunately, I did not have any good references so was unable to produce this modification in time.
You might find a small gap between the fuselage and wing top. Do not fill it. Hold the
wing tip up until it closes the gap and strap it up until the cement hardens.
The new engines are nicely represented, with a tube down to the fan which fits neatly between the nacelle halves. Make sure they butt up tight to the front edge and you will be pleased with the results.
The whole surface of the model has a sand blasted finish and will benefit from a gentle rub over with 1000 grade wet and dry paper, especially if you want to use gloss paints later. The revolving radar is designed to do just that, but do take care with the cement on parts 55-56, the moving parts.
The pylons, parts 57 and 58, were cemented to the fuselage before painting, but the dish was not mounted until very last after painting and applying the decals.
Painting
The instruction sheet covers this quite well with details given for all the little parts etc. The overall colour for the RAF aircraft is Barley Grey Humbrol No.167 or HX7. I myself have used Xtra Color X17 Barley Grey with a gloss finish and I used a full tin, so make sure to start with a fresh tin. After the decals were applied, I coated the whole model with Gunze Sangyo flat acrylic varnish, just one coat to give a nice sheen.The radome has a white centre section which I sprayed first, exceeding the zigzag edges. When dry, I masked the white to the outer edges of the zigzag in a straight line and sprayed the black. The mask was removed and a small brush was used to fill in the tiny black areas either side using the moulded lines as a guide. A bit time consuming, but well worth it in the end.
Summary
For a nice change, here is a model that is easy to build with quite pleasing results. There is but one problem, it is very big and quite heavy with all that nose weight. My arm truly was aching at the end of the spraying session and I lost count of how many things I knocked over with the other end of the model! However, you get a lot for your money with this one!

#Back to the Top
| Last
Page |
Airbase |
What's New |
Home |
Reviews |
Next Page |