
Tamiya
McDonnell Douglas
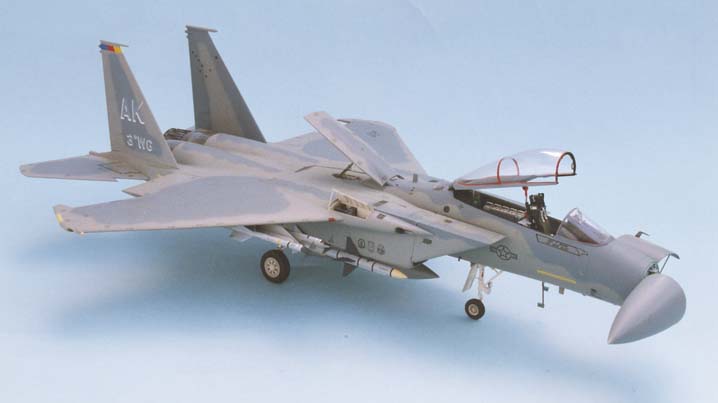
F-15C Eagle
Kit No. 60304. 1: 32nd scale
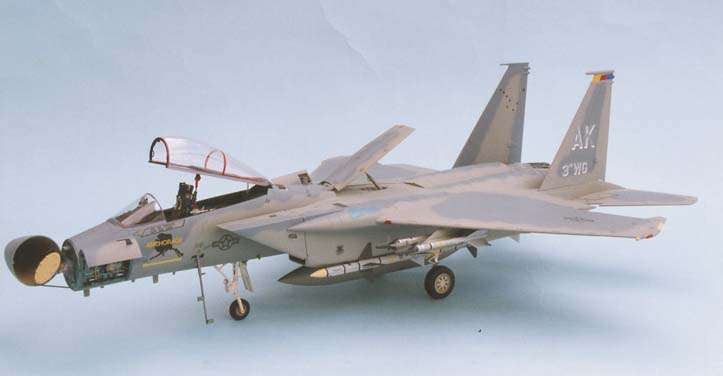
I think I made it clear in my review of the strike eagle that I was pretty impressed with the kit and my opinion has not changed with this latest release although the kit has, not in quality of course but content and subject, this version is the "C" a dedicated air superiority fighter so out have gone all those bombs to be replaced with air to air missiles, so too has the lower fuselage with it's conformal fuel tanks, you now have a clean bare fuselage shaped moulding which is right up to date with chaff dispensers and all. To cover the narrower fighter wheels new non bulged undercarriage doors are provided along with the clips to hold the sparrow missiles on the lower corners of the fuselage, so prominent on the fighter versions of this bird, the missiles themselves are little gems with some of the fins moulded separately as are the cable ducts along the body of the weapon.
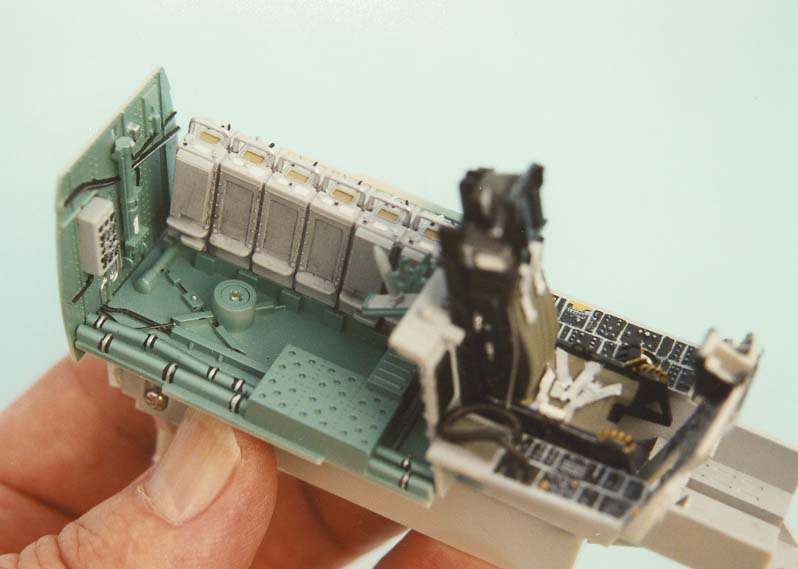
The front of the fuselage uses the same two halves as the strike eagle for the outer shell but the interior is all new with the correct instrumentation on the pilots panel and as far as I can tell the side consoles are quite good, again the CRT's are from clear plastic with decals to back them up but I found mine were printed in reverse order (left to right) so I cut them into three vertical strips and added them to match the proper screens, they have even changed the " HUD" to the two screen version now that really is paying attention to detail. The avionics bay or bay 5 as the area behind the pilot is commonly known is well done with a new floor and its plumbing etc. and new side walls covered with circuit breaker panels and "black boxes", the port side has all the demountable boxes with detailed tops and handles most of these are still classified but Tamiya have managed to sneak 'em in even the canopy lockdown mechanism is faithfully reproduced.
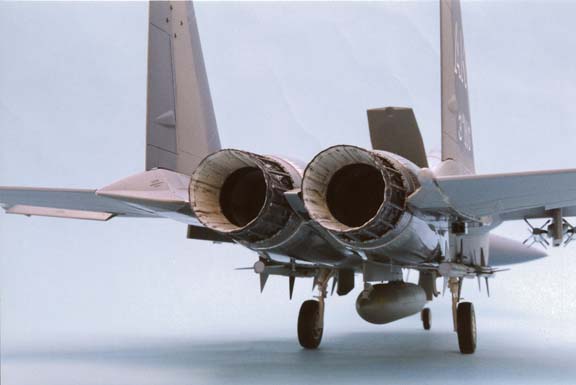
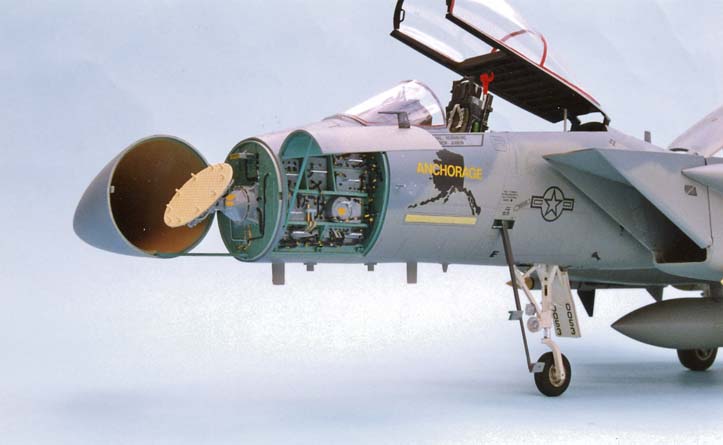
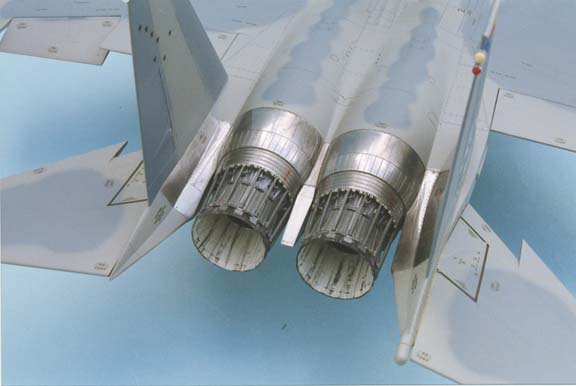
In single seater aircraft the canopy is slightly less bulged and consequently has a lower profile at the rear end and this is reflected in the new canopy and matching fuselage section immediately to the rear of it, the rear deck inside the canopy is authentically decorated with ribs and rivets but does lack the canopy locking hooks, scope perhaps for the superdetailers. Moving right along now to the rear end you will find the same highly detailed engine exhausts and now included is the tail hook fairing and the exposed end of the hook which means you can not display it in the lowered position mind you I have never seen one lowered, plus you get the choice of three tail cones with and without ECM pod, that's about all of the new stuff but you still get the highly detailed radar array in the nose cone plus that electronics bay on the port side of the nose section where you really can make your own mark, and the multi barrelled cannon is well worth a little extra effort with your paint brush.
The parts are so well engineered they fit together almost perfectly without any difficulty and an outstanding model can be built straight out of the box, there are markings for three aircraft on the decal sheet, two out of Kadena AFB. and the other out of Anchorage, Alaska, plenty of badges and stencils including markings for the missiles on top of these there is a sheet of "remove before flight" tags, all the planes are new ships and carry the new camouflage colours, Tamiya provide mixes for them but Xtracolor can supply the correct paint to Federal Standard specs , these are FS16251 (X132) and FS16176 (X157) these are the colours that the guys at Kadena tested out and found to be most effective.
My construction notes are quite short as the kit instructions sheet covers most everything, I stuck to gluing the seams and left them to harden before adding the screws to avoid any misalignment through strain, the seat will need some straps if you intend not to put the pilot in I have used foil from a wine bottle but not directly after consuming the contents of said bottle as although minimal they are a little fiddly, my buckles came from the reheat set, a little tip here, thread the foil through the buckles before you cut them from the frame and you won't have to look all over the floor for them. In step 7 remove the moulded details on the rear cockpit inner wall of part A3, if you have no drill and burrs use a curved knife blade, until the surface is smooth fill the gap at the top of part F17 with scraps of plasticard to match the rest, now paint all the detail before cementing in place. In step 8 again remove the details from the wall but this time replace it with ribs like those in the front office, I have used 20 thou strip 1.5mm wide from the Plastruct styrene range (see photo) you could also add a wiring loom along the top of the boxes when installed. Turn your half section over and with a sharp knife remove all the moulded handles from the black boxes in the electronics bay, drill a tiny hole where each end of the handles were and insert fine telephone wire replacements, bend the ends of the wires over from the inside and superglue, next job is to add a few more pieces of wire to the looms moulded in already again a few tiny holes with wires bent over and glued will make all the difference but do check your references and add the most prominent.
Painting here is most important the boxes are a dark grey, cables are black with yellow marks and the handles are silver but the base colour of both these bays and the radar plate part D9 is X159 interior blue, green. Do paint the intake trunking before assembly and do not forget parts 43 in step 9. There is no need to add the intakes in step 12 these can be positioned after you have added the front fuselage and cleaned up any joint marks take note of which side they fit as they are handed. Before fitting the end wall part D23 I drilled a small hole where the door prop lays then I made a new L shaped prop from florists wire to replace the plastic one which keeps falling over, cut to length in situ when you add the door, part A13. There is no need to cement the exhausts on in step 17 they are a tight pop on fit after all the painting is finished. Take care to add parts D40/48 and D41/49 to main metal legs before priming with Revell basic colour in step 19. There are two small strakes to assist the launch of the sparrow missiles, on the lower fuselage parts G19/20 these should be positioned with the more pointed end forward and angled down, fitted in step 20. The tail fins in step 31 have locating hooks on which prevent removal after a dry run so I just snipped off the tips so I could mount them after all the painting was finished.
Step 38 shows the fitting of the air brake; if you want to show it a bit lower just reduce the length of the ram on part D68. There is one other small job to do and that's to remove the mould line from the centre of the canopy, I first lightly sliced it with a new scalpel blade then sanded it with 1200 grade paper until it was smooth then a quick polish up with "final touch" canopy polish to restore the shine. The paint around the edges of the canopy XF-6 is copper though it's not listed but I prefer to use Humbrol 73 matt wine, which looks quite effective.
The painting instructions are quite explicit throughout but I would advise you to cut out page four as the paint list is on this page and should be pinned up in front of you as you are constantly asked to refer to it. I have followed these most of the way but my rear fuselage is silvered with Rub 'n buff silver leaf and a touch of " Zebo" black grate polish, after the decals were applied I coated the whole model with Johnson's "klear" then a thin dusting of matt varnish.
Another fine model from the master modelmakers Tamiya I think you will be pleased with this one in spite of the high price.
Ted Taylor Feb 95.
#Back to the Top
| Last
Page |
Airbase |
What's New |
Home |
Reviews |
Next Page |