
Revell/Monogram
Grumman A-6E Intruder
Kit No. 4578. 1:48th scale
Revell/Monogram
Grumman A-6E Intruder
Kit No. 4578. 1:48th scale

Revell’s 1:48 scale A-6E Intruder is one of those kits that surprises you with its amount of detail the more you look into it. I always think of the Intruder as an ugly aircraft, but nonetheless, a real working machine, which seems to draw my attention.
The kit is moulded in a soft grey plastic, which is very easy to work on, there is a little flash but nothing drastic. Surface detailing is nicely executed with fine raised panel lines, which, without getting too complicated, are quite effective. The cockpit bathtub has the bases of the seats moulded in, a Monogram influence showing through here I feel, and a practice I hate to see for you cannot substitute some of the metal seats that are available. However, in this case when the rest of the seats are assembled they look pretty good.
Lots of moulded detail pipe work etc., appears on the back shelf and the side and central consoles abound with raised knobs and switches, which look spot on. Two separate instrument panel fascias are provided for the standard ‘E’ and the ‘Tram’ equipped aircraft that has the radar display shroud fitted. Wheel bays are nicely done with some pipe-work in the main bays and good ribbing on the doors, including a detailed retracting mechanism. The nose bay has separate sidewalls with doors attached that make for easy painting of the detailing therein. All the legs carry the plumbing for brakes etc. and on the whole are very convincing.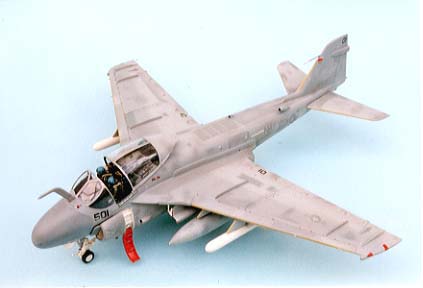
A detailed fan for the front of each engine adds a little realism to the intakes, also some detailing in the air brake bays, which will show if using the earlier brake panel with its holes. If you are making the later Tram version, then you can use the alternative plates provided as by this time the brakes had been deleted and plates bolted over the holes; the hinges had been plated as well. All the other extras for the Tram aircraft are provided and these are the ball turret, the tiny scoop by the canopy and the large air scoop, for extra cooling, on the fuselage just forward of the tail fin.
As if that wasn’t enough a large number of external stores are thrown in, these are a centerline and two wing fuel tanks as a base plus Harpoon missiles. Then we have four detailed MER’s with separate steadies, on which you can mount a bunch of Rockeye cluster bombs and a dozen lovely little Snake yes, the type that explode of course!
The instruction sheet is pretty comprehensive with a fair amount of colour information in each step and clear notations for requirements of each type. Two drawings give loading possibilities for each type, something most sheets forget, as younger modellers tend to fit everything if not told. Overall painting instructions are quite authentic with decal placement clearly shown. Federal Standard numbers are given so the enthusiast can get it right and the address to write to for the FS595A publication and they have still got the Room Number wrong, it should be Room 6662.
The decals provide markings for two aircraft; one is a colourful CAG machine of VA 1 96 aboard USS Coral Sea with its big ace of spades most prominent on the fin. This aircraft sports the light gull grey over white scheme and is quite eye-catching. The other aircraft is from VA-85 the Black Falcons, finished in the tactical greys scheme, the particular aircraft being the Sqdn Cmdr’s which sports two kill markings as a result of its operating in the well publicised Libyan raid. Here I noted two faults; the AA tail codes should be in the lighter grey to show up a little better and the crew names should be on a dark background, the latter being easy to correct with some trim film decal.
CONSTRUCTION NOTES
You must decide which version to build at the start so you can fit the correct instrument panel. I would suggest that you carefully cut off the refuelling probe at its first “joint” as soon as you start or you could break it off several times as I did!
Although most joints are good, the panel with the tail hook, part 15, leaves a gap at the front but, if you level off the draught angle you can insert a sliver of 10-15 thou card to fill the gap. Trim when hardened off, but do make sure that the panel is dead centre or the dive brakes will not align properly. Trim a little plastic off the hinges so they sit in the recesses a little neater and fill the areas with a little Milliput or the like as both aircraft have the bolted plates on them.
When you make up the intakes be sure you fit them to the fuselage before the interiors are set or you could have a problem with alignment. The wing trailing edges are a trifle thick and would benefit from a little sanding of the inner surfaces before cementing together. Also, don’t cement the wheel bay to the top surface of the wing or it will be too thin at the fuselage join. The detail around the exhausts is nicely produced but the pipe itself is a bit heavy and the use of a half round file on the edges will make a marked improvement.
The starboard wing fitted okay but the port wing needed a little trimming to get a good joint, but a little Milliput was needed both sides to round out the exhaust fairing into the fuselage. The main gear support struts parts 88-69 are wrongly noted, they should be on the opposite sides.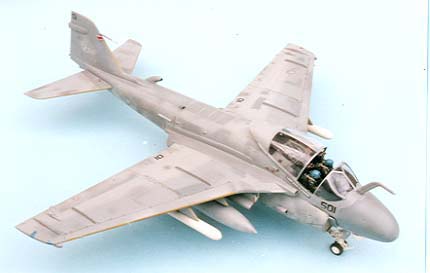
A large sink mark was apparent on part 56 air scoop so I drilled it out to 2mm size and plugged it with some 80
thou Contrail rod which was then sanded to shape. Don’t forget to drill out the front of the scoop itself to give an impression of depth. If you apply cement to both tabs on the tailplanes they will lock on to each other with no need for cement on the outside. When you fit the pitot part 120 into the fin, make a centre mark with a drill bit as a good
location then let a little super glue run around the join to fill the remaining area. Use Permabond C2 that will fill a fairish gap with no trouble at all.
I thought the boarding ladder part 27 was a bit basic because of the thickness of the plastic so decided to make a new one from 15 thou card. Just lay the original on the card and draw around it to get the shape of the sides and cement an outer skin to them adding the steps before it all goes hard. You can then drill the lightening holes in the sides to represent the full-size item. Affix it to the model at a late stage or it will get broken off. One other modification I made was to add formation strip lights on the fuselage from the Tripart panel collection PB1, as I feel sure the Libyan raiders carried them but the other aircraft in the grey and white scheme doesn’t.
The Snake eye bombs with their folded retarding fins are quite the nicest I’ve seen but the cluster bombs need care to sort out the halves as some fit better than others. If you take care and get them all right the joins virtually disappear. They can be painted gloss white or olive green whichever takes your fancy.
PAINTING
I have used Humbrol colours USN3 and USN4 Light and Dark Compass Greys. If you can’t find these then 127 and 128 from the basic range are the equivalent colours or you could try Xtracolor X135 and X136 for the overall finish. I lightly masked up the walkways and used USN2 FS 36270 to give just a little contrast, although when I added an assortment of light and dark grey patches for that weathered effect, I lightened up the walkways slightly and made them a little less distinct by spraying a little indiscriminately from a fair distance. I haven’t gone overboard with the weathering for fear of making it look unreal, but photos of the real aircraft show it to be really patchy all over. Just a piece of card to make a few straight edges, a few corners or boxes and add a few straight squirts here and there. Nothing too definite or heavy and you can achieve an effect that has people asking how did you do it?
A small prop is provided to keep the tail up but if you don’t wish to use this then, before you fit the instrument coaming part 53, add some shot mixed with a drop of epoxy resin into the nose cone. There is a big enough gap to just pour it in and hide it.SUMMARY
While this may not be the World’s best, or most detailed kit, it is also not the most expensive However, it is certainly very good value for the money and one I feel sure you will want to get your teeth into once you have looked in the box. If this is a sample of the Revell Monogram tie up then more power to their elbow —let’s show the Japanese what can be done in the West at a fair price!
REFERENCES
Vol.24 Detail and Scale A-6 Intruder
.Vol.5 Colours and Markings A-6Intruder.
Aeroguide No.15 A-6E Intruder.
No.20 Squadron Signal in Action A-6Intruders.
Plus numerous colour photos in the new Osprey series of books on the carriers and Navy Air Wings.
Kokufan No.27 A-6 Intruders.