ITALERI
C-119
flying boxcar
Kit No. 146. 1:72nd scale
ITALERI
C-119
flying boxcar
Kit No. 146. 1:72nd scale
Italeri, in recent years seem to have concentrated on making truck kits with the odd aircraft subject thrown in for effect. This latest offering shows that the company is certainly a serious contender in the 1/72nd scale field. Apart from the old Aurora C-119, no other company has dared to touch the old Box car in case it proved to be a flop. Italeri must be congratulated, for, not only attempting it, but for making an excellent set of mouldings which reflect the experience gained of late by their tool makers.
The kit comes on four sprues of nicely detailed parts which seem to be broken down in the most carefully thought out way, you will only appreciate this as you begin construction and find how nicely the joins seem to disappear.
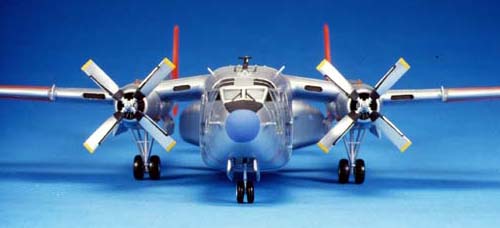
Panel lines etc., are very fine raised lines which look quiet impressive under a coat of paint. The interior detail looks very realistic, with four seats and a table in the cockpit (no they don’t serve tea!). Walls are full of boxes and things and the instrument panels have nicely raised details which will look very impressive if dry-brushed with white paint. The fit of the parts in all cases is very good but a couple of items don’t have very clear or firm locations. The cabin windows, part E20, has a moulded switch panel on the inside and fits the fuselage like a dream, the glazing is quite extensive and the cockpit is very visible so I feel it would be folly not to get the “office” looking at its best.
The instruction sheet is adequate for construction purposes and contains the most comprehensive interior painting guide that I have seen in an Italeri kit. But when it comes to the external colouring, there is a serious lack of information. Firstly, each aeroplane is given only one side view, which isn't too much of a problem with the silver versions, but it is quite a different case trying to find views of the other side on the S.E. Asia scheme unless you have other references. Secondly, on the Italian scheme the side view doesn't match up to the top view. Whilst care has been taken to include Federal Standard numbers, where applicable, it is pretty obvious that there is a lack of co-ordination in the art dept.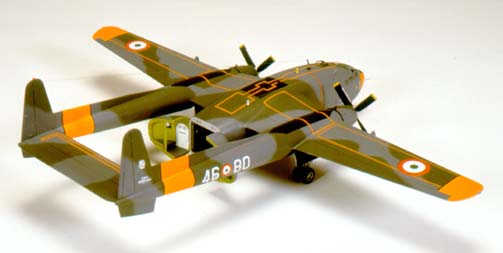
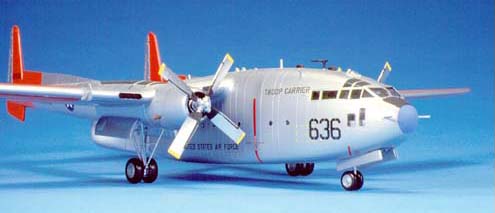
Decals are supplied for five different aircraft covering a period from 1952-82. These are for USAF, Italian Air Force, Chinese Nationalists Air Force, Belgian Air Force and a French machine used in Indochina in 1954 before it became known as “Vietnam”.
While all the national insignia are provided not a lot of stencils are evident. Walkways are provided, black for silver machines, orange for camouflage aircraft, but unfortunately they only supply half of the required amount in each case. You can overcome this without too much difficulty by using some of the Scalemaster decal striping (available from Hannants), you might also be hard pushed to find decals for the other propeller.
CONSTRUCTION NOTES
For the greater part, construction is fairly straightforward and easy but a couple of items need pointing out for special attention.
1) The tabletop part A 16 should fit below the moulded ridge on wall A 15 or it will be level with the windows.
2) Nose weight is required and 20 gms is recommended, but I needed a lot more than that so don’t fit the cockpit glazing yet, you will find there is enough room to put small shot or weights between the instrument coaming and fuselage right into the nose section till you get it right.
3) Take care when fitting parts B21 wheel-bays into lower boom section, make sure they will be parallel to the ground or your undercarriage will be bowlegged.
4) The undercarriage parts A59 & 60 must be checked to see that the axles are at 90 degrees to the struts or you will get a toe in or out effect, the locators here are quite tiny and could easily be distorted. These parts will also benefit from a light scraping to remove a tiny mould line but take care, as they are quite delicate.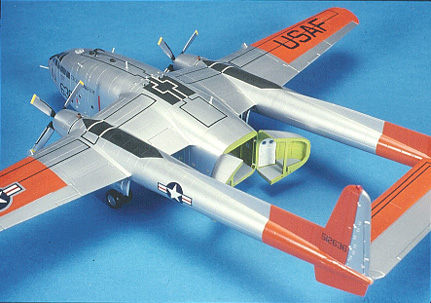
I chose a slightly different order of construction to that shown on the sheet, what I did basically, was to build the fuselage and keep it separate from the wings and boom assembly. By adding the booms and tailplane to the wing centre section I was able to place it on a firm flat base to keep the whole unit square, a big advantage when building this type of aircraft. The outer wings can be added and easily aligned, and when hardened, what little cleaning up that is needed can easily be done. The boom joints needed just a little sanding, but if care and only a small amount of liquid cement is used, this will be minimal and only a little of the raised detail will be lost. The wing/fuselage joint is so good when you place the two units together you could have difficulty finding where to put the cement!
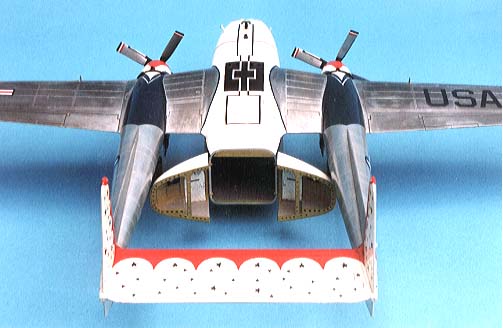
EXTRA DETAILS A very nice model is easy “from the box” and if I had more references, I could probably find extra details to add. However, I have made a couple of improvements I think worth mentioning. The engine cowlings are depicted with cooling gills slightly open, and as these aren't used for cementing, I was able to thin down the edges for a little more realism. Furthermore, I used a razor saw to cut between each petal to give an individual look.The rear of the fuselage is really two large doors that swing open to allow cargo to be on or off-loaded, the kit accurately follows this and even supplies the internal structures for each side of the clam shell. A photo provided on the instruction sheet illustrates these quite well showing all the lightening holes in the structures. Judicious use of drills and a round file on parts A31 & 35 will give pleasing results if you wish to show the doors open, and with such a nicely detailed cargo bay what modeller can resist the temptation to display it opened out. I have constructed a 1/72nd scale truck from the Hasegawa range of military vehicles, which is backed up to the cargo bay, and would you believe it, the cargo bay floor is level with the truck body!PAINTING AND FINISHING
Areas using dark grey were painted with Humbrol 27 Sea Grey and Hu 130 was used for the white parts. For the zinc chromate parts I have used HumbroI 81 to which I added a little green to offset the bright yellow. The undercarriage and bays were painted an Aluminium colour from one of the Humbrol range of silvers.
Firstly the cabin windows were covered with masking tape, the edges being pressed down with a cocktail stick, then each window cut out in situ. I find it’s much easier to do it this way. The round cargo windows had a dab of PVA glue deposited on each which is left to dry. This can be easily lifted off after painting. All other orifices were suitably covered with tape.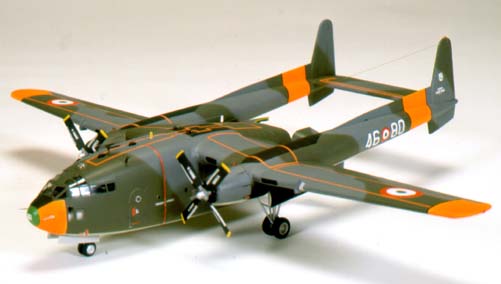
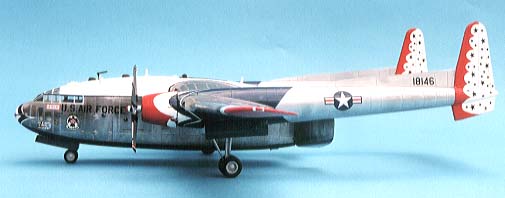
As the Italian machine carries Day-Glo orange FS 28915 I decided this would go on first, so a whiteHS 228 undercoat was applied around these areas then two coats of Precision Paint M 162 Orange were applied over the general areas. After a day drying they were masked off accurately. Next, the various areas of black were sprayed, left to dry and masked before proceeding to the main camouflage; here I used Hu 164 Dark Sea Grey over all for the upper surfaces. When this was dry, I marked out the green areas with a soft pencil and sprayed Hu 163 Green, which I think is about correct. The bottom of the booms and fuselage were masked with tape lightly laid on for the underside colour to be sprayed. This is described as metallic grey which I take to be the same as the Luftwaffe RAL 9006.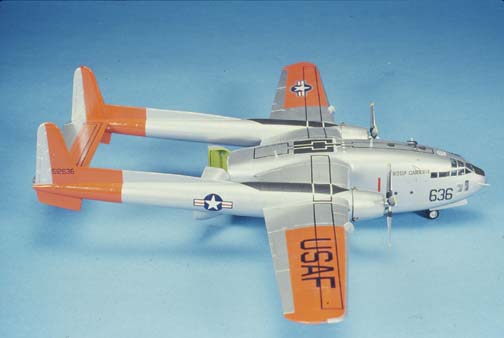
If you want to try the overall silver US scheme and you cant find FS 12197 Orange, use Humbrol 82 or HR 132 Orange Lining which is as near as you’ll get to a perfect match. I have used Hu polished aluminium that has not been polished which, when covered with a coat of Johnson's Klear, gives an excellent finish.
When I was happy with the painting I removed all the masking except the windows (l noted that not one single piece of paint had lifted with the masking tape).
A quick dust over with a goat mop removed any dust particles and a coat of Klear was applied all over with a 3/4 in. wide Humbrol flat brush. This coat was dry in 20-30 minutes which allowed the decalling to get under way. Italeri decals are of totally matt finish and the decal film will show terribly if you don’t sandwich them between varnish layers or fail to press them down firmly with a padded damp hanky. A second coat of Klear was left overnight and checked next day, having satisfied myself that all was well the various aerials and probes were added and painted before spraying Humbrol 135 Satin Varnish over the whole model providing the nice even finish that I like.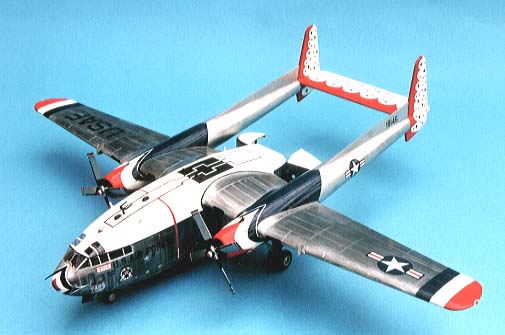
Time to remove the window masking and paint the windshield wipers, add the rear doors, open or closed, and the complete engine cowlings with props then the exhaust pipes. Cement the undercarriage into position and there you have it, a very nice model of an aeroplane that grows on you. Well done Italeri!
The T-bird you see interspersed here was the aircraft used by the team during 1955 and I built it as a part of the thunderbirds theme I did some years ago, construction was standard and the colour scheme was found in an old Magazine called "Replica in scale"
The silver finish was done with Rub n' buff which was the best finish around at the time, now we could use alclad II. All the scallop painting was done by hand but the stars were hard to find in those days and came from several decal sheets (took forever to do) the badges were gleaned from various sheets but remember the flag panel had only 12 flags in it as the T-Birds had not travelled the world then.
|
Last Page |
Airbase |
What's New |
Home |
Reviews |
Next Page |