
Revell
Fire trucks
a selection of
Kit No. 00000. 1: 25th scale
Revell's Mercedes 1017 LF16
This is the type of tender that turns up when your cat gets stuck up a tree and, as such, perhaps is not as glamorous as the escape ladder. However, don’t let that put you off, as there is so much detail in the open bodywork you’ll be able to spend hours painting all the little bits.
The vehicle is based on a four wheel drive chassis and, although the front axle/steering arrangement is pretty poor, I think there could be lots of scope for conversion ideas.
Construction notes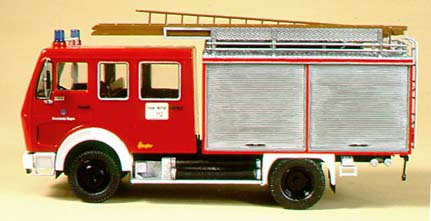
Take care when making up the front axle, it is very difficult to cement the axle halves without fixing the steering pins, which have to be trapped between. It is quite clear that whoever designed this model should change his occupation!
Parts 123 and 124 need careful removal from the frame, as these can easily be broken. Don’t forget to put all the decals on the inside of the cab before you close it up. Assembly of the bodywork in steps 30 and 31 needs a little extra attention, the parts will require careful cleaning up of edges and just a little adjustment of locations for a snug fit. However, proceed with caution as amounts are quite small, another case for some dry runs!
The location for decal 36 is an uneven surface, which presents seating problems for the decal. I preferred to place the decal onto 10 thou. card and, when dry, cut them out and cement to the walls.
The ‘hoses’ supplied look quite good and Revel! are to be congratulated on trying to find something to represent the real thing. Do heed the warning though, to seal the cutting points or the covering will fray and look a right mess. I used white PVA glue to fix the ends. Give the ladders a scraping down the outside edges to clear off the mould lines and improve the general appearance.
There is lots of painting information in the instruction sheet but, in step 2, paint the surround of the headlights on the bumper bar not the ‘glass’ as seems to be indicated. The model certainly looks impressive when finished.as you can see plenty of detail inside
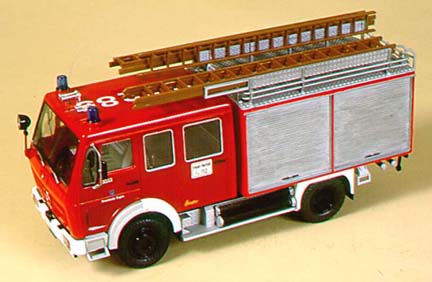
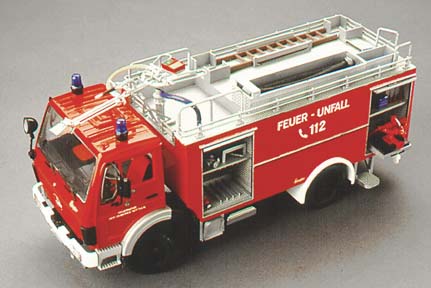
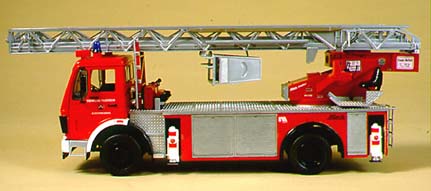
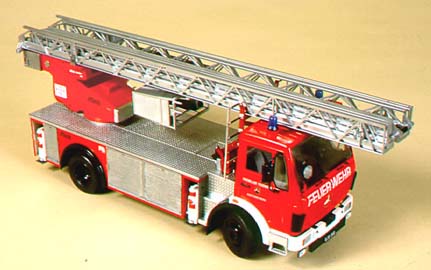
Revell Mercedes 1625 Fire Truck TLF 24/50. 1:24 scale.
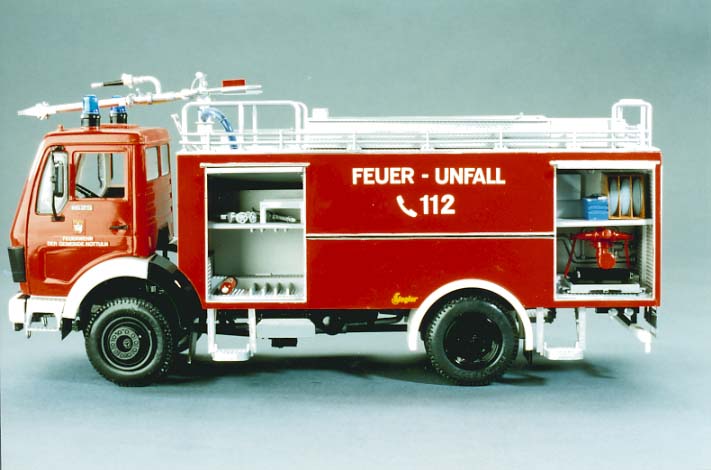
Kit no. 7516.This particular fire truck was designed for use on autobahns, but was so successful that it is now used on all sorts of emergencies. It is built around the 1625 Mercedes truck chassis with a powerful rear mounted pump. This can deliver the 1100 gallons it carries, in the centre-mounted tank, at around 500 gallons per minute. It also carries approximately 110 gallons of foam, which can be delivered via the roof-mounted nozzle, which swivels through 360 degrees. The four wheel drive vehicle carries a crew of three in a day type cab plus all the usual fire fighting equipment in the compartments behind the four shuttered side doors with the rear shutter as access to the main pumper unit.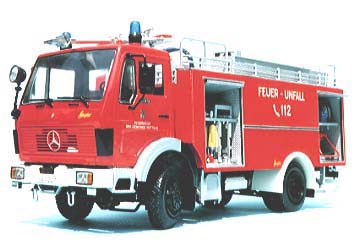
Revell have combined the chassis from the LF-16 (kit no. 7460) with the cab of Metz ladder kit (no.7504) and added a new body with its end lockers. As mentioned in the Dec.’88 issue of SMI!, the front axle is a very poor representation of a driven axle which is a pity. The reason it’s poorly made is so the wheels can steer, but when you swivel them they swing around the ends of the axle, rather than pivoting about their centre line. Although the cab is a nice replica the hinges for the doors are gross and I personally left them off and cemented the doors shut. That’s all the gripes out of the way, now the good news! The bodywork and cabin are all moulded in white plastic which makes it so much easier to paint all that bright red! Construction is covered in detail with a 16 page booklet that even the newest beginner could cope with. The decal sheet covers three cities’ brigades and there are a number of good photos of the real truck on the box top to help with those extra details.
Construction notes
Chassis: Take care to get crossmember, part 4, the right way round. Look for the small tab on the left-hand frame rail, part 1. Crossmember part 5 fits to the rear of the tabs on parts 1 and 3, not in front as shown. Add the new frame extension, part 135, but not the bumper bar, part 8, until the chassis is sprayed.
The transfer box, parts 24 and 25, will need to be moved over a bit as the exhaust pipe will not fit alongside, but beware as the air tank, part 39, has to fit the other side. When adding the new cab mounts, parts 136,137 and 138, employ part 124 front mudguard assembly (not used in this model) to align the tops of the mounts, keeping the correct distance of 46mm between them.
As a little improvement on the cabin front grille, part 122, I sanded away at the rear until the grille bars in the centre section showed the gaps between them. Check the fuel tank halves, parts 72 and 73, as it is possible to put them together wrongly with the straps not level.
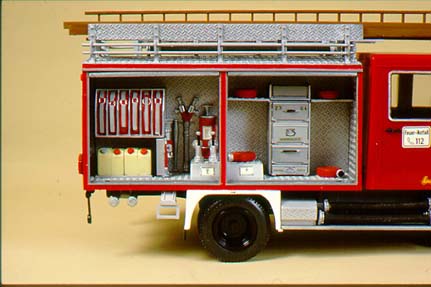
The body panels are pretty easy to manage but note that the inner walls, parts 61 and 62, are wrongly numbered. It is therefore worth having a dry run checking whether tabs fit in front or behind the walls or shelves. When you are familiar with the assembly cement the whole lot in one go using part 57, the left-hand side panel, for alignment.
Step 40: Part 176 for the sliding tray is depicted the wrong way round, the “handles” should be outward facing. The “runners”, parts 175, should be cemented to the floor in Step 41 so the tray can slide out, see the box top photos.
Step 46: This covers the side steps and mine had some flash, which required cleaning up. If yours do, take care not to remove the small stop on the ends of the frame. Also, the location holes on parts 78 and 79 need attention from a no.52 drill for the steps to locate snugly in them. Ignore parts 83 as they are not used in this kit. The support brackets, parts 147, is not handed and will not fit as shown. I have, in fact, made new brackets from 20 thou plastic card, but some A3 Plastruct will do just as well. I waited until the whole body was completed before mounting onto the chassis that includes the handrails and boxes on the root.
On parts 94, hose box, the ends are bare while the rest of the roof has an overall tread pattern. Slaters and Plastruct both sell sheets of embossed treadplate suitable to cover the ends and other bare surfaces. Part 85 is the battery box shield, but it is very thick, so I replaced it with 15 thou card, which looked a little better. Also, the driving mirrors can be improved with a little trimming around the arm mounts.
The body fits onto the chassis easily, though I found the front end a little sloppy, but a small dab of epoxy resin on the chassis held the front quite firmly.
Painting
The instruction sheet covers colouring throughout the individual stages, quite comprehensively, as one would expect. However, I have my own method of painting which works well. I build the chassis and as many of its components as possible, then spray the whole assembly. For the body panels and cab parts I spray as separate pieces to keep the areas small, but this does require careful construction later. Lots of my interior paint is applied by brush, mainly using a 3/l6in. flat. These are good for rubber window surrounds or edge lining as well. All the parts painted silver I have coated with Johnson Wax Klear which dries in a minute or two and seals the paint, so it does not rub off or leak into other colours painted over it.Summary
A reasonable kit, one you can spend quite a few hours on if you want to super detail the model.
Another welcome addition to my growing collection.
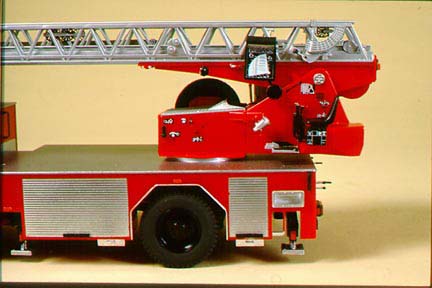
Revell - Mercedes Turntable Ladder Fire Escape
Kit No 7504
Although the model looks quite impressive when finished, some parts of the kit are, at best, quite basic. For instance, the front axle has only the bottom half of a kingpin and unless you take action the front wheels fall all over the place. A simple answer is to add a small ‘D’ shaped plate to the top half of parts 11 and 14, drill through these and into the top of the axle with a 1.25mm drill thus keeping the wheel firmly anchored (Sketch C).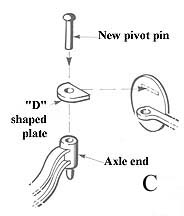
There is no steering box or linkage so here is a job for the super-detailer. I didn’t bother, however, as you can’t see it when all is finished.
There was a bit of flash on my sample and also some mould lines, which require the scrape and sand treatment to ensure a good painting finish.
Vinyl tubing is supplied for the hydraulic lines to the outriggers but you will need a location on the leg casings. I have drilled two 1 mm holes in the top corners of the back plates and inserted 1 mm rod which the vinyl tubing can be pushed onto. Remember to drill the holes in the bodywork before you go too far.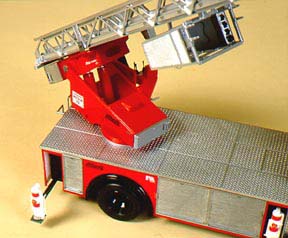
The mirrors and arms are moulded as one and you can improve their appearance by spending a few minutes trimming them with a sharp knife to make them look like separate items; it makes all the difference! The instrument panel in the cab has raised details and decals are also supplied, so either paint them or rub them down and apply the decals.
The bodywork is moulded in silver plastic so any parts to be painted red appear dull on such a dark background. To overcome this problem I used Revell’s Basic Color aerosol paint which, being very fast drying and white, gives just the right base for either the red, or dayglo, colour schemes.
I like this model and, after painting various details, it only took me a day and a half to assemble it.
<>
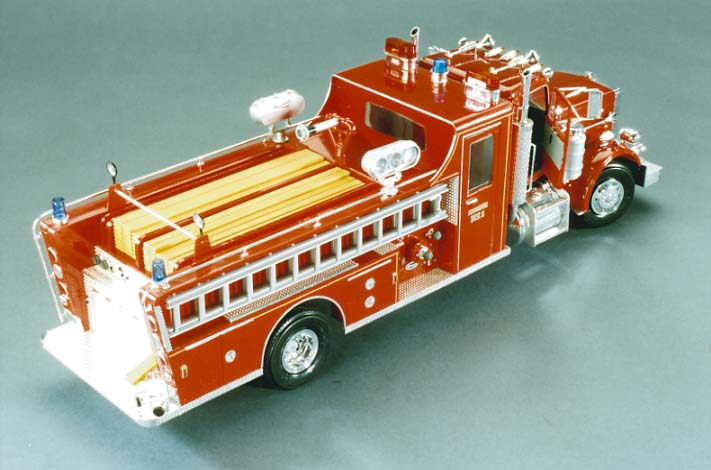
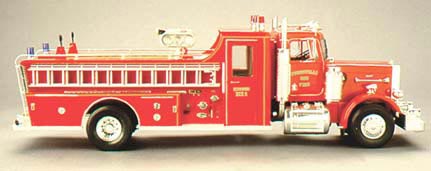
It has been nearly 20 years since AMT’s American fire trucks were issued, so Revell’s Peterbilt Fire Truck release is long overdue and most welcome. The kit (no.7529) comes in a large box and is crammed full giving you plenty to do. The plastic is moulded in appropriate colours i.e. red for the bodywork and black for the chassis. There is a lot of chrome sprues for your delectation and the latest Revell vinyl tyres, which are much better than those ‘real’ rubber items previously issued. Revell Peterbilt fire truck
kit No 07529
A 24-page instruction sheet takes you through construction in great detail and includes quite good painting details. This is, of course, essential with so many pieces to be pre-painted. The decal sheet is not large but covers all you need for the one town depicted,
Burnsville, (very apt indeed!). Take care when using them as they are very thin and delicate; a very commendable feature that occurs in many of Revell’s kits these days.
The model is based upon the “Pete” unit already in the range, but comes with new chassis frame rails and drive shafts to suit a single axle outfit. The body represents a pumper with crew cabin, the pump is mounted on the chassis and driven via a PTO (Power Take Off) box midway along the drive shaft, with outlets on both sides and on the rear. Lots of hoses are provided, folded and stacked just as on the full-size truck.
Construction notes
Step 3: Do not fit part 10, rear cab mount, until you actually fit the assembled cab, as in its depicted location it is about 1/8in. too far aft, so trim the ends to suit the chassis further forward. Mount your hood line up the cab and cement mount between the rails remembering to keep the correct height.
Step 4: The front pins on part 12, spring bracket, will not line up so cut it off and rest it on the step provided. Make up your engine but do not mount it in the frame rails until the chassis is completed and sprayed, but use it as a guide for propshafts etc. Take care when adding the turbos in Step 16, they have to line up with the exhaust and intake pipes later.
Step 31: This covers the front axle and here I found there was terrible “toe in”. The only way to cure this, is to shorten the track rod slightly once you have the wheels on. I cut just a very small piece out of the middle and rejoined the rod ends with a small length of Contrail tube.
Step 43: Seat cushions, part 100, have a rough sharp rear edge so just round off the corners by scraping with a knife blade to improve the appearance a little. There is quite a lot of chrome parts to join up in this kit and I use several methods to achieve this. For some I use epoxy resin to avoid scraping the chrome, for others I use Revell’s Contacta Special for the same reason. However, for most pieces I scrape the plating away as this makes the strongest join, but do be careful as the chrome is brittle and will easily flake away from other areas.
Step 45: Test fit the tank halves, parts 228 and 229, as they fit better one way around than the other. As they are a tight fit you many not need glue at all, but you will have to trim the peg off part 144, filler cap, so that it will fit flush. Also, the air tank bracket, part 192, should be fitted to chassis early on before painting, then add the air tank when convenient.
Bodywork: I would normally recommend spraying each body panel separately and for this cab and hood, I did. However, as there are a number of joints on the main body that would be difficult to clean up after painting, I would suggest that you build up the body (excluding the chrome and silver parts) then clean up the joins that do show. This does not create any problems as a number of surfaces are small and can be covered by one sweep of your airbrush. These should be done first, leaving the highly visible outer panels until last to avoid overspray. Leave to one side for a couple of days to harden before handling.Assembly of the cab is uncomplicated, but I find the easiest way to work the piano door hinge is to cement hinge pins 123, 124, 126 and 127 to cab shell before painting. Later, hinges 125 and 128 can be partially inserted into the completed doors and cement applied. Hook over the hinge pins and push right home, this will avoid cementing the hinge solid. All these parts will benefit from a little cleaning up before cementing to make sure they are free fitting when pressed in tightly.The hood needs holes drilling to take new horns. After drilling one side, use masking tape with locations marked on to ensure the other side matches up. The front wings (fenders), parts 187 and 188, can be improved by scraping the arched outer edge to thin it down and round off the lip. One improvement I do like is the inclusion of wire mesh to fit in the radiator grille. It is already cut to size and just needs spraying black and mounting with a dab of super glue (the gel variety).
Step 58: Cab mounts, parts 139 and 140, fit to the bottom of the firewall, part 110. Although it is not too clear on the instructions, give them a chance to harden off before mounting on chassis as they could be under some strain.
Step 78: This deals with the mirrors. I would advise you to deal with these and all the other little bits towards the end of the construction. Note that the mirror arms are handed and some delicate scraping of the chrome will be needed for the whole lot to fit neatly together.
Step 96: When you add parts 289, make sure they clear the area of the window, part 285 and seat part 283. As a base for the bodywork, footplates are provided which have a nice tread pattern moulded on. A good feature is that Revell have moulded the edges as separate pieces which enables you to have detailing on the vertical surfaces, most other manufacturers would have left them smooth. With careful scraping of the areas to be cemented you will be able to make an excellent job as the corners have mitred joints. This is an excellent method, which is just not used often enough. There is a hole in each of parts 298 and 295 for the door hinge to locate. These may need to opened out just a bit.
Step 103: The water cannon is a rigid affair, but I have made it movable by simply cutting one shoulder from the yoke at the joint then drilling a 1mm hole through the barrel and into each shoulder. Add a piece of 1mm rod and put it all back together. The remainder of construction is fairly easy and all that remains is to add the details.
To add colour to the clear parts on lights and flashing beacons, I have made wide use of Tamiya’s Clear acrylics. These work just as well on chrome parts, such as the marker lights and turn indicators etc.
An excellent model well up to Revell’s standards.

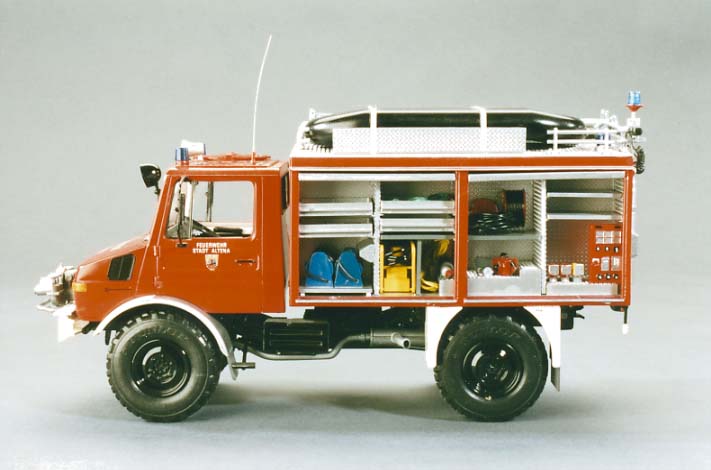
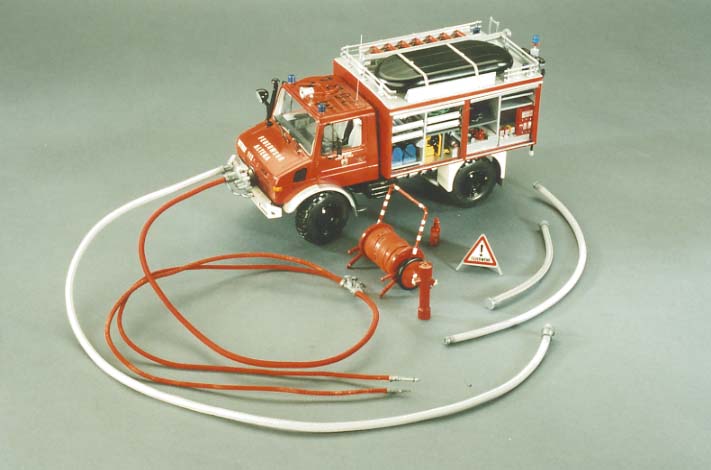
Schlingmann Unimog RW1
Kit No 07505
Recently arrived for review is this Mercedes specialist fire, accident and emergency rig. It is rather similar to its big brother the LF1 6 (kit no.7460) with its roller shutter bodywork, pull out drawers, tools and equipment which include a chain saw and generator. The chassis is a 4x4 or four wheel drive outfit as used by the military with single wheels for easy cross country travel. The cab is well appointed with pedals and gear shifts plus, of course, the seats. The doors are separate pieces with moveable hinges so you can show off your interior work.
<>A windscreen is provided but features those awful Revell location blocks on the edges. These can be removed and polished out with Brasso but it’s just as easy to replace with ‘Poly Glaze’ clear sheet. In any event, you will have to make rear windows as none are supplied! Four nice rubber tyres are included along with some cable, elasticated hoses and some more wire grille mesh, all of which looks as if it can add up to quite a smart little model.
<><>I like the fact that the bodywork and cab are all in red plastic, with wings, bumpers etc, in white. This makes painting so much easier as you only need a thin coat of paint to get a bright colour, particularly if you intend to spray your model.
<>
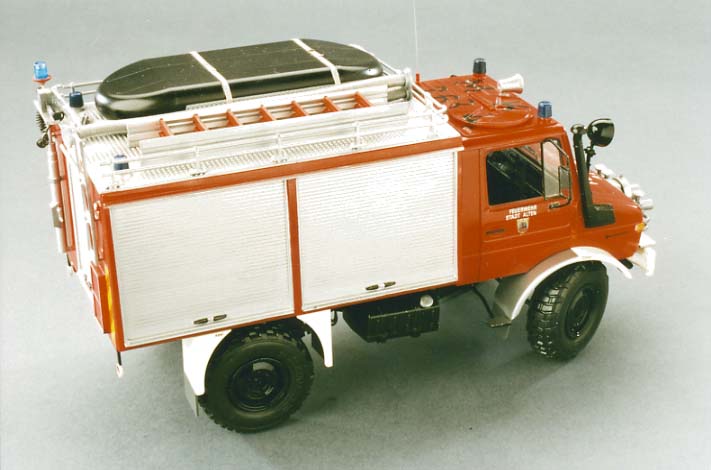
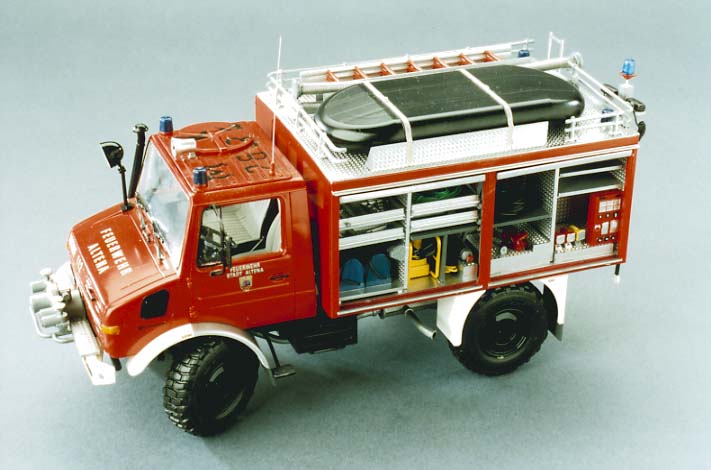
The Unimog RW1 (kit no 75O5) quite a nice little brother for all the big fire trucks reviewed so far.
As an added bonus in the TLF 24/50, but not mentioned in the instructions, you get the fire-fighting accessory. set, kit no. 75O8 This contains various lengths and thickness of hose, a hydrant, a stand-pipe, various nozzles and hose fittings plus a hose reel, warning triangle, air bottles and fire extinguisher.
<>Obviously these items are intended for you to build a small diorama using the Unimog as they include a forward facing pump/valve unit to fix onto the front bumper. Revell also makes a set of firemen figures, kit (no.7515) six figures are included, a chief, a driver and four others, and all have separate arms, heads and torsos, so you can vary the poses. All in all, an Impressive display of fire fighting men and machines.<>
<>
#Back to the Top
| Last
Page |
Airbase |
What's New |
Home |
Reviews |
Next Page |