
PP Aerokits
FAIREY FIREFLY, FR4/5
Scale 1/48th, No AK001

PP Aerokits
FAIREY FIREFLY, FR4/5
Scale 1/48th, No AK001
Having recently completed a couple of Dynavector multi media models and been very pleased with the results I looked forward to building the firefly kit as I have admired Tim Perry's work in recent years for his attention to detail and delicate touch with small parts, however the kit is not quite what I expected, let me state here and now this one is not for beginners or the feint hearted.
The kit comes in a good strong box, ideal for mail order, as it is not available in your local model shop, only direct from the manufacturers. I was quite impressed when I opened the box, there is a very big frame of etched metal parts with every conceivable tiny detail included, another bag held the white metal parts such as the under carriage legs and bodies for the rockets to name but two while a third bag contains a number of resin castings, one large piece being the wheel bays, which when combined with the brass parts looks most convincing. The major components of the plane are vacuformed but there are only five of these so it's no great chore cutting them out, the canopy mouldings are well protected and you get a duplicate set in case you go wrong when cutting out, they are quite clear considering the material they are made from. Markings for four aircraft are provided on a large decal sheet, these are very thin and adhere quite well but one must take great care when cutting from the sheet as the whole sheet is varnished as one item so each design must be cut out separately and this can be tricky as some items are so tiny and close together but none the less the quality is quite good. A lot of small manufacturers these days seem to skimp on instructions but not in this case, eight A4 sheets of instructions are in the box, four of which are illustrations the remainder are good lessons in the use of each material plus written words to explain the illustrations, although there is a wealth of information I still found it hard to comprehend some parts as some arrows go to wrong locations and a couple of parts are not shown at all, I still can't find places for one or two decals.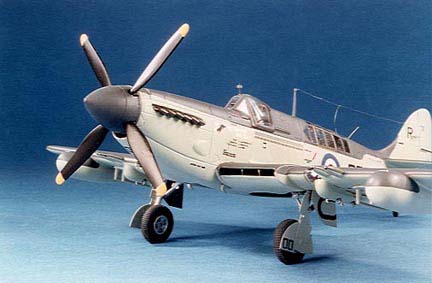
Construction notes I hope may fill in the gaps Each cockpit is made up from three resin parts, before supergluing them together rest the brass sideframes in position to make sure the ends are at the right angle. Instrument panel E20 needs the bottom corners cut out so it will fit between the sideframes and try as I might I could not fit the compass mounting E12 as shown so I glued it to the underside of the plastic rod bridge. Take care not to get the "radio boxes " in the observers cockpit mixed up, a lot of painting and dry brushing is required before assembling the main parts but it is well worth it as the cockpits look very busy, it seems such a shame that most of it is hidden when in the fuselage. While those assemblies were drying I tackled the vacform parts, easy to cut out and clean up but do take note of the instructions regarding the waste areas and when you cut these out finally cut just inside the waste and use a sanding block to finish off, this avoids taking out too much accidentally.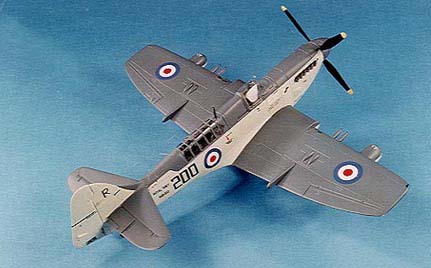
The wings were sanded back to the correct profile and the trailing edges thinned down carefully, after cutting out the wheel doors I proceeded to fit the resin bays, here I came up against a problem, if fitted as shown the legs would not go into the allotted holes, the only way over this was to add a strip of 80thou card to the front edge of the lower wing between the radiators this solved the problem but gave me others, the splitter plates needed to be enlarged and the rear of the resin bays had to be sanded down to let the wing top surface sit properly but don't over do it, part M19 was missing from my landing light assembly but it was made up as directed using a scratch built lens from plastic sprue but first I sanded down the edges of M18 so that when the clear plastic cover was added it was still flush with the wing surface, make sure that the bomb rack R19 does not foul and displace the light.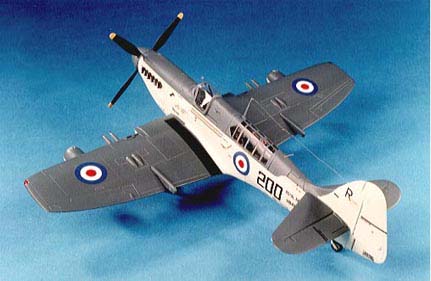
Caution is advised when sanding out the fuselage, I had still a bit to go on the nose section when I offered up part R8 to check the fit and I found the two halves only just fitted around the resin part, lesson is do not sand right back to the line before checking. I deviated from the plans here a little, the fuselage was assembled with the exception of the cockpits then after hardening and cleaning up the joint a lip was filed around the rear observers area so that the canopy would fit flush then the cockpits were added, rearmost first, this made it easy to ensure they were level and I was pleased with the way they met the top of the fuselage perfectly, I made sure these would not move by running an epoxy resin collar around underneath which also helps to keep the fuselage stable when fitting to the wing section. A little filler is required around the wing join I used standard milliput as this is very easy to work with a wet finger gently smoothing over and the excess can be washed away rather than sanded then after a general clean up all the remaining cockpit furniture was added before the canopies were finally cemented in place again using Humbrol superfast epoxy, just a thin bead around the edge giving you time to adjust and not affecting the plastic or the canopy if any oozes out it can be wiped clean with a finger quickly, then a slightly wetted finger will smooth the surface as it begins to set.
As I intended to airbrush the model the canopies needed masking and for this I used ordinary sellotape, a word of caution here never use it on anything other than canopies as it will surely pull off any paint beneath it, my method is to lay bits of tape on tiny windows such as the windscreen then run around the edges with a cocktail stick, because the tape is clear you can see to cut round the edges of the frames with a new scalpel remove the excess and the "glass" is covered, on compound curves like the hood place the tape over the widest part then pinch the edges until it conforms to the curves before cutting, the observers section just had a strip along each side, meeting at the top again the cocktail stick pressed the edges down firmly and each pane was cut individually, remove the bits and pieces and spray both areas with matt black or dark grey to represent the interior colours.
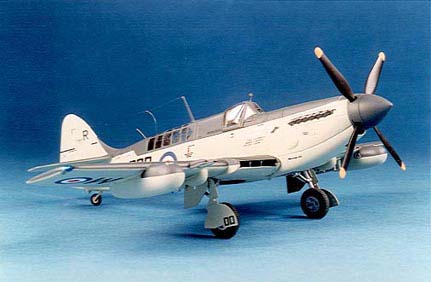
In preparation for spraying you have two choices you can mount the various bomb racks etc and cut your decals around them later or paint and decal first then add the racks each to his own preferred method, the fuel tanks will not affect either method so add them first and give your model a final dust off ready for painting, I have used Xtracolor X7 RAF sky, but Humbrol No 90 is a match, this was sprayed freehand making sure to overlap the areas of the upper surface colour particularly wing and tailplane edges plus all the parts like doors and racks etc. I left this to harden for a day before masking with Tamiya tape which is very low tack and will very rarely peel off any paint, the fuselage is straight forward but the fin was masked completely and a light cut with a scalpel was made to create the upward curve and the edge of the tailplanes, the fuel tanks had a piece of tape wrapped horizontally around the centre line and two bits vertically level with the wing leading edge. Using Xtracolor X5 or Humbrol 27 extra dark sea grey spray the top surface keeping the airbrush almost closed to avoid overspray, hold the airbrush at ninety degrees to the wing and run along the leading and trailing edges you should get a nice dividing line then after removing the masking use a small flat paint brush and the paint from the spray jar touch up any blemishes and the curved return of the fuel tanks, I find this easier than trying to mask these areas.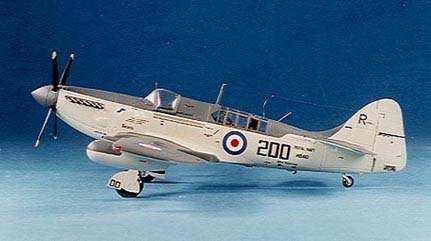
The decals are well done with separate centres to the roundels and good strong whites that won't show the grey through but take care and use a soft brush to move the decals into position as they are very thin and will easily curl over, while the plans cover most of the decals the side views suffer from heavy tinting which obliterates some of the finer stuff however when all were on I coated the whole model with Johnson Klear to seal them, all the tiny aerials etc. were added and painted before a light spray all over with Revell N§2 flat varnish, just enough to produce a sheen. When you are satisfied with the finish it's time to remove the canopy masking . I have a neat way of making navigation lights, first I paint them Humbrol N§ 11 silver, leave them to dry then overpaint with Tamiya clear red, blue or green, it really makes them sparkle. Final touches included prop and spinner which I superglued, the flattened tyres, the pilots mirror and aerial wire plus the individual exhaust stubs which were painted using Tamiya gun metal X10, I thought this looked quite good.
I haven't mentioned the weapons yet but you get some beauties, two 500 lb. bombs made up with 13 parts right down to tiny fuse vanes and mounting shackles, I found these a little difficult to make as my fingers are a bit clumsy but I am sure you will be impressed, two white metal rocket bodies with delicate brass fins, also included is a winch pod for the TT.6 version a resin body with tiny brass supports and turbine blades, this version makes an interesting contrast to the usual sky and grey being silver with yellow and black undersides.
Summary, on the whole a good kit from a small manufacturer, stupendous amounts of detail a pity a lot of it can't be seen though, the fit of the parts isn't 100% but manageable, surface detail is not the best I have ever seen but later kits are improved I am told, one thing I must say this was the most difficult project I have attempted, several times I put it down and made another kit for a break, a nice model a bit " over engineered" in my opinion but if you are into superdetailing then go for this one it really is SUPERB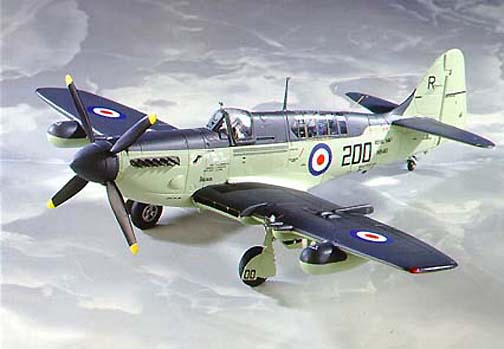
NOTE
the Firefly kit is now owned by Flightpath
and has now been revamped entirely
TED TAYLOR Sept 95
Last Page
Airbase
What's New
Home
Reviews
Next Page