Revell
F-4F PhantomII
converted to an
Israeli F-4E
Kit No. 0000. 1:32nd scale
Revell
F-4F PhantomII
converted to an
Israeli F-4E
Kit No. 0000. 1:32nd scale
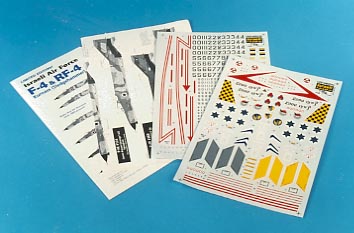
The F-4F is only used by the Luftwaffe and is normally quite drab since they changed to these greyish schemes, although I added some light blue patches it still wasn't too bright and I wanted something to stand out in a crowd which meant converting to an "E" variant, at about this time a sheet of decals No CED32001 from Cutting Edge landed on my desk which contains markings for a lot of Israeli F-4s including the one with the red and white stripe along the fuselage, they claim that you can build almost every Israeli Phantom and I believe them, this double sheet is also available in 1/48th and 1/72nd scales.
The decals are well printed and very thin with lots of Hebrew markings included, they are well researched in Israel and lots of information is included you only have to find a picture of the one you want, this was what I was looking for so work began.
All Israeli F-4s have slotted tails this was a problem until I remembered the old Revell kit which had them and I had one in the loft which soon donated it's parts for a good cause, unfortunately they would not fit as was so using a razor saw I cut the slots off from the top half right where the bottom half butts up to it, next I removed just the leading edge of the newer tail and then cemented the slots in their place taking care to line up the outer edges and top surfaces. When the joins hardened I sanded the lower edge back until it matched the new tail maintaining the curve, level off the inner edge and there you have it slotted tails, don't worry if you haven't got the old kit as I am advised that one of the resin parts makers has the idea in hand so watch the ads'.
Phantoms that have been standing for a while tend to loose hydraulic pressure and the outer flap starts to droop I thought this would make a more interesting model so before assembling the wing halves I cut around the outer flaps with a very sharp knife until upper and lower surfaces were free, the wing halves were then assembled and left to set mean while some bits of sprue were gathered for packing out the gaps. The inner rear edges of the wing ,where the flap fits, were scraped to a thinner profile and a piece of appropriate sized sprue glued into the gaps. While this hardened the flap parts were cemented at the rear edge and sprue that gave the depth to match the wing was fitted to the extreme front edge this was then sanded to a rounded shape and a concave shape was scraped into the rear of the wing with a round knife blade, Revell plasto was used to fill all the side surfaces and was sanded to a smooth finish. The flaps were later taped in position while the top camouflage was sprayed on and cemented as a final step.
TISEO (Target Identification System Electro Optical) is now carried by a lot of aircraft in service today and as no models of this exist I had to make it from a length of TBFS 8 from the new Plastruct fineline styrene range, take a 29mm piece trim out a rough shape of the wing section then wrap a strip of medium garnet paper tight over the wing leading edge now sand the tube in situ keeping the tube parallel to the fuselage, until you have 11mm of the tube left on the inner side, if you got it right you should have 20mm left on the outer side (see Fig 3) build something that looks like a TV lens from rod and place inside the tube, the "glass" front cover I made from clear sheet using a leather punch which had the right size cutter and two tiny strakes were added from spare 10thou card, this unit was put aside while I corrected the panel lines representing the leading edge slats on the inner wing, only the outer section works on slatted wings so fill the unwanted lines with a small drop of superglue and sand smooth then rescribe the central dividing line straight to the rear line of the flap (see Fig 4)
Israeli phantoms use a probe and drogue system for I.F.R. this makes a model look a bit different so after the fuselage was assembled I took a length of 2mm square rod appx 80mm long and heated one end over a candle until I could bend it to shape, it's a bit hit and miss but I managed it at the third try, the rod was then scraped to the section shown in Fig 5 placed in position and cut to the required length, a hole to take Plastruct TB 1 was drilled before being cemented in position, later a nozzle was fashioned from sprue and a similar hole made at the back of it, the "pipe" was bent up and added to be fitted after painting.
The cockpit was next and here I used the etched brass set by Pat Watson available from Hannants, the first job was to widen the sills with 40thou strips stuck flush with the very top edge this forms a good base for the brass sill parts which needed just a little trimming to fit on the insides. Nearly all the frames for the canopy were used, the exception being the rear of each hood, in reality there is large chunk of metal there and I built them up from 20thou card incorporating new hinges from 40thou card which were to fit into corresponding slots cut into the bridge and rear fairing, finally add the latches and mirrors. I had a bit of good fortune just then I came across some very fine resin seats made by Paragon and I acquired a pair, note pair not two of the same,
which only needed painting and pull cords added from fine plastic coated wire. The seats needed raising to the correct height also due to the low floor this was accomplished using Blu-tack and pushing the seat down on it to suit. All the mods I incorporated in the Luftwaffe model were repeated here and the small triangular "shelf" on the starboard side of the spine was removed plus strips of 10thou card were cut to size and cemented in place ready to accept the light strips after painting.
I have a certain procedure which I follow it works for me, perhaps you might like to try it, firstly if the cockpit is to be open all the canopies are left off and the cockpit area masked off with ordinary masking tape, the canopies only are masked with Selotape, lay a strip on each window run around the frames with a cocktail stick then carefully cut around with scalpel and remove all the excess when all is done spray with Humbrol 85 black this gives the internal colour, the nose cone can also be done now. I like to use Rub 'n' Buff for the metal areas at the rear end but Humbrol polished steel works quite well also, To seal this in use a couple of coats of Klear then mask the area and the nose cone using Tamiya tape (the gentlest of them all) now wipe off any excess silver with a drop of lighter fuel. For the main painting I fit wheelbay doors in position with Blu-tack where possible, items like pylons are mounted on cocktail sticks along with missiles and tanks etc. the camouflage is sprayed on using the lightest colour first, all is done freehand, unless a sharp edge is needed when Parafilm is used, keep all three colours in their jars for retouching if you make a slip anywhere I normally paint only the top surface one day and the underside the next this gives me somewhere to hold the model. When I am satisfied a couple of coats of Klear are sprayed on and the very lightly rubbed over with a well worn piece of 1200 wet or dry paper which gives a real silky smooth finish exactly right for decalling which follows, a further couple of coats of Klear to level everything off and then a light dusting of Revell's No 2 mat varnish to suit your requirements, go careful as it is very flat, then all the masking can be removed. Now is the time to add all the remaining parts some with cement some with superglue such as pylons put superglue on the part and brush activator on the area to receive it, position with care and you have instant stick.
Painting
The four colours for the camouflage are as follows FS 33531, FS 34227,
FS 30219 for the topside and FS 35622 below, these are available from Humbrol Nos. 121, 120, 119 and 122 as well as Xtracolor Nos. X105, X148, X102 and X149 respectively, you will find the Humbrol paint Matt and Xtracolor gloss.
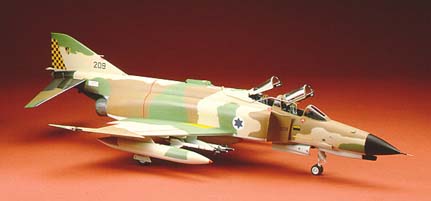
One final job was to add the clear part lights which can be coloured with Tamiya clear paints and add the nose pitot tube which I fashioned from the tube on an empty Revell contacta glue dispenser, just shows, don't throw anything away. I think the model looks fantastic and it gave me much pleasure I hope it does the same for you.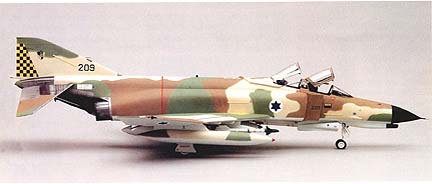
we used this pic in the Modelling encyclopedia
#Back_to_the_top
Last Page
Airbase
What's New
Home
Reviews
Next Page