Aeroclub
English Electric Canberra
B.Mk.2
Twin Jet Bomber
Kit No. 2. 1:48th scale
Aeroclub
English Electric Canberra
B.Mk.2
Twin Jet Bomber
Kit No. 2. 1:48th scale
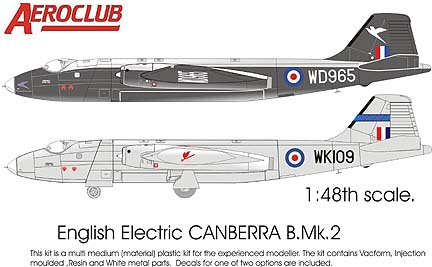
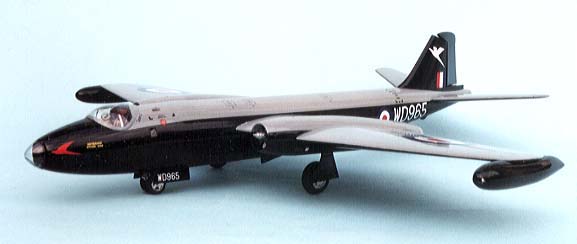
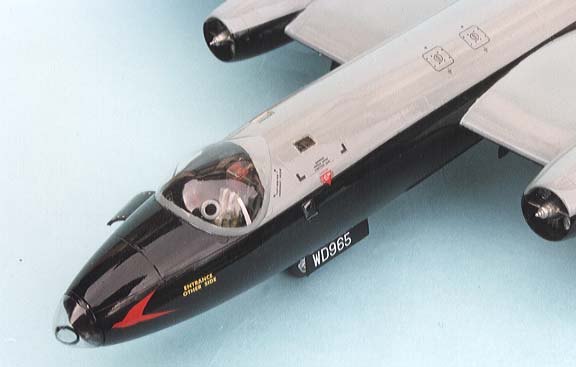
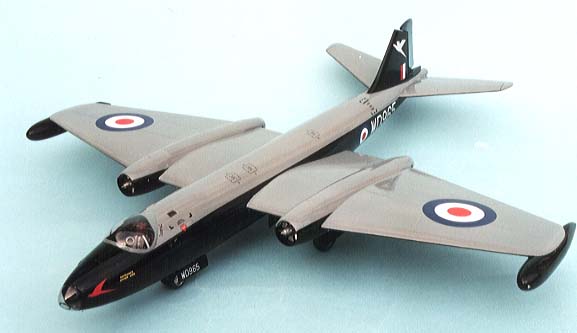
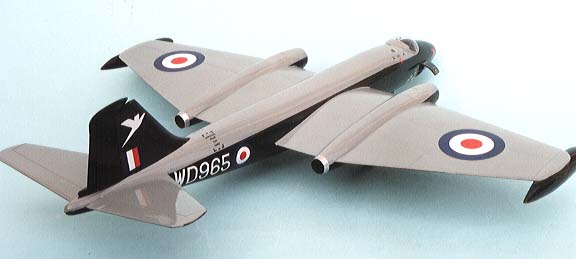
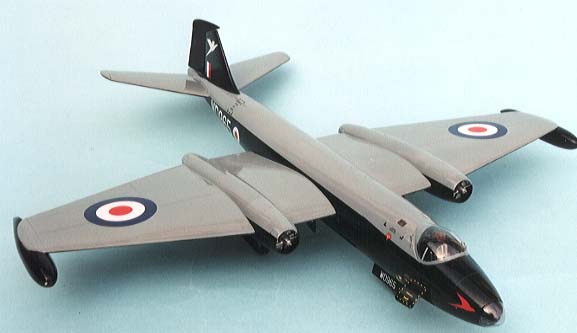
This is second multimedia Canberra kit By John Adams Of Aeroclub, and contains a vac form fuselage and wings plus an injection moulded cockpit/nose section as well as tailplanes, Gear doors and tip tanks. Most of the cockpit interior is formed in white metal as are the main gear legs and nose wheel parts thus adding all the nose weight you need and the engine intakes and exhausts are moulded in resin. The instructions are comprehensive and the order of assembly should be followed precisely. There are markings for two aircraft on the decal sheet, one a B.Mk.2, a silver machine of 44 sqdn, and a B.Mk.2 of 6 sqdn in Black and grey camouflage .
Construction must begin with the injection moulded nose section, cut out the top window on each part, which was impossible to mould as such. Make sure part no 7 is sloping back when you cement it to the floor (part 2) and bulkhead (part 3) this will give you the correct angle to match the cabin wall, it is possible to place it the wrong way round, well I did at first.
The rear seats should not be left out just because they can not be seen when all is closed up as they are essential for the weight to keep the nose down, but they need lowering a bit as they will touch the “roof” so file a fraction off the bottom and check with the cabin side wall.
The navigators shelf (part 8) should not be mounted until after you have fitted the rear seats as the seats are a little high so mount it slightly above its proper location. I spoke with aeroclub about this and it all boils down to the fact that you can’t mould some of the components to scale thickness to match the real aeroplane i.e. the floor and outer skin.
Add the rear and fwd bulkheads, keeping the angles correct but don’t mount panel (part 11) until you can place the cockpit into the stbd fuselage half where you can adjust the angle.
All the interior consoles etc. should be painted now and added to the structure, add the rear seats and all the wall fittings then close up the two halves of the nose section. If you want the crew entry door shut, now is the time to do it and add the nose wheel bay
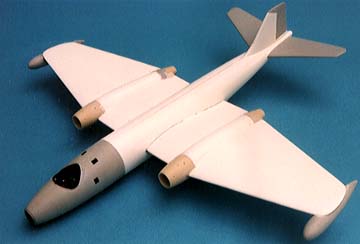
Time to start the scraping and filing of the vac form parts, there are only six pieces to do but do read the notes about them and heed the warning not to take too much away, use the nose section as a guide to the correct diameter of the rear fuselage halves, scraping first then sanding just a little at a time, it took me some 30 mins to do each of the two halves. Make up the rudder halves and this will give you a guide when sanding the rear end and fin.Cut out the slots for the wing and tailplane spars but keep them as tight as possible, when happy with the fit slide the spars into one half of the fuselage from the inside then add the second half and cement but don’t flood the joint, tape the joins and check spars are level then place the nose section into position to maintain the cross section and glue that also.
After 24 hrs the tapes were removed and the joins gently sanded, although filler was added very little of it remained after the final sanding down, showing how good the joins were.
The wings, once cut out need little sanding but ofcourse sand the trailing edges as much as possible, trim the cut-outs for the resin intakes undersize and sand back later when the wing is assembled, they are correct, but this is one of my safety procedures.
A trick I learned from “Dynavector“ kits was to strengthen the wing sections by gluing a strip of 40thou card along the inside centre line of each half using superglue, (don’t use cement as it will eat through the plastic eventually), these were appx 100 X 15mm fitted in the outer section, it is amazing how strong they make the wing. Cement the halves together and take John Adams’s tip, run a bead of superglue along the rear edge, when this is dry you can sand it to a razor sharp edge.
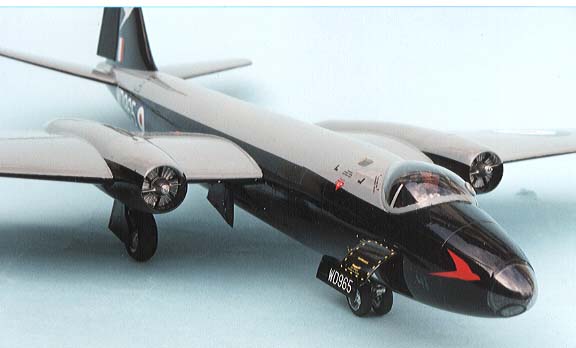
The main gear structure is superb, built onto the main spar with metal walls and legs that just cannot be assembled any way but right (said I) making a very strong assembly and location for the wings also, these just slip over the framework and are cemented to the fuselage sides. Once these were hard fit the intakes and tailpipes sanding back the recess’s to make a good fit, again I added filler here but little was left when sanded down as you can see from the photos.
The tailplanes were added and checked for alignment and the rudder was positioned, the tip tanks were made up and offered up to the wing it’s self, the fit is not too close but that again is due to moulding techniques which would have involved an undercut so some gentle sanding then a bit of filler came to the rescue. That was all the building done, preparation for painting was next on the list. The whole model was rubbed over with 1000 grade wet and dry paper to remove all those vacuum pimples and any stray filler, then repeated with a worn bit of 1200 grade to get that smooth finish needed, the model was then washed with an old shaving brush in warm water with a drop of dish wash soap, rinsed off and left overnight to dry out.
Humbrol Paints were used, No85 Black and No165 sea grey medium, which are silk finish, I used Tamiya masking tape for the sharp demarcations and when the masking was removed I brushed a coat of Johnson’s KLEAR (Future) over the whole model.
Using my well-worn 1200 grade wet and dry paper the whole thing was very lightly rubbed over to a silky smooth finish and another coat applied before adding all the decals. These were then sealed with another coat, again brushed on with a half-inch wide brush and well worked out.
My canopy and nose cone were cut out with scissors and trimmed with a sharp scalpel, it fitted perfectly in the groove that surrounds the cockpit, and if you make a slip then there is a spare supplied, this was fixed with cement but I used PVA glue for the nose cone and the DV (direct vision) window. The remaining small windows were glazed with “Krystal Klear”.
The final job was to paint and fit the wheels, the main are resin and the nose ones metal, then the gear doors were added and that was it.
An excellent model, easy to do, easy to paint and easy on the eye, a well balanced model well worth the asking price.
Ted Taylor